
Canon FS4000US Film Scanner
Scanning XPan panoramic format negatives

Officially the FS4000 will not fully scan a panoramic negative from the Hasselblad XPan camera however by using a software application called Vuescan it is possible to scan XPan negs in a two stage process. This is meant to be due to hardware limitations but since the offset works in software it is as if the scanner hardware/firmware can only scan a 35mm frame window - so isn't it interesting that the neg carrier is suitably designed to allow offset working!
Normal 35mm frame - 24 x 36
XPan frame - 24 x 65
The filmholder is a clamshell type which sandwiches the neg strip - notably the holder has capacity for six normal 35mm frames with a plastic separator between frames 2/3 and 4/5 which means that a full panoramic frame is available between dividers.

Method:
Use either combination of 1/2, 3/4 or 5/6
eg: Place xpan neg into position 3/4
Basically the first scan is done on frame 3 with no Frame Offset and
then frame 4 is done using a negative Frame Offset (I use
-4.495 ) which gives a reasonable amount of overlap to
work with. The trick is to get similar exposure characteristics
for each frame so there is no apparent difference when joining the two
frames.
I've found this to be tricky but I tend to use fixed focus and also the
Exposure Lock feature.
Typical settings -
Lock Exposure : CHECKED
RGB exposure : 2.867 (this will vary)
Infrared exposure : 2.785
Exposure clipping (%) : 0.1
Lock Film Base Color : CHECKED (assume subsequent scans are all from the
same roll of film)
Lock Image Color : CHECKED (assume subsequent scans are from the same
scene)
Note: Using v 8.1.1 I found the Film Lock and Image Color Lock options
were not always apparent ( they seemed to be a subset of the Lock
Exposure) but with v 8.1.4 both options will appear directly without the
Lock Exposure being checked (maybe this was a flaw that was fixed in
8.1.4 ).
Note 2: Since used v 8.3.26
Projector Review
Braun Paxiscope XL episcope

Interesting machine this. Years ago I was told by somebody of a device known as an epidiascope that could project photo prints (indeed opaque objects) but trying to find out about such things was quite a task. Eventually I found out that this machine was a combination of an episcope and a diascope.
Episcope: a device that projects an image using reflected light
Diascope: a device that projects an image using transmitted light (through the medium).
Well, slide projectors are diascopes so no problem there - however, to find an episcope was a tall order. I never found an epidiascope as such but in the library was a book (dating from the 1930's I think) that described the principle of an episcope and by the time I was trying to think of how to build one lo and behold I discovered Braun indeed sold one. They were all over the place in Germany but fairly rare in NZ.
Brilliant - I could now project prints (and other opaque objects like bus/train tickets, maps, etc) onto white walls which was useful for wee travel talks and stuff. I'm still fascinated by the concept of projecting images using reflected light - should have paid more attention to the ol' physics classes I guess.
For travel/presentation talks the Paxiscope is suitable for small gatherings but the room has to be quite dark. The eyes adapt to the lower brightness of the Paxiscope and if you need to read notes a small film light-box can be used to backlight a paper sheet without interfering with the main display.
These units generate a lot of heat so be careful not to block the air vents or the expensive bulbs will expire early.
At this point I must say that the illumination from the episcope is not as bright as a slide projector so always view the episcope stuff prior to viewing slide stuff otherwise folk will be more disappointed than usual.
Some folk do not like the brightness (or lack of in this case) compared to slide projectors but if you want to show film prints it is about the only way to do it.
With the digital age the alternative would be to scan the film negs and project the digital snap which presumably will be as bright as slide projectors.
Overall I was pleased with the Paxiscope and it would be interesting to see how much better the XXL model that Braun produce is - it's got 4 x 360W halogen bulbs as opposed to 1 x 300W so I suspect it should burn the house down.
Tip:
The Paxiscope doesn't have a lens cover but I found that using a Laughing Cow (La Vache qui Rit) cheese container worked just fine. I just needed to make some cuts to the edge and then tape the edge to give a snug fit on the lens.
Epson Perfection V700 Photo scanner
Scanning Negatives

Scanner: Epson Perfection V700 Photo
Software: Vuescan 9 x64 v9.7.82
MacOS 10.13.6 (High Sierra)
Scanner gives good quality scans of negs but my unit does have an annoying issue.
Issue: The preview scan will often fail and produce a flashing red light on the power switch. As far as I can determine the problem lies with the top unit which is used when doing transparency scans rather than reflective.
The forums suggest that it may be a known issue with the scanner and Epson can repair but I don't have a convenient service department so have to live with it. Basically when it happens the 'running noises' are quite different so I just Cancel the Preview and do a power off/on. Unfortunately the repower means the scanner type needs to be set again in the Vuescan software. Once the scanner is selected again then a lot of the previous settings are restored but not all so some changes may be necessary before trying Preview again. Opening/closing the top lid may also be needed before the power cycle but not always.
If batch scanning is being used then all the preliminary settings will have to be redone
Typical failure results -


Once a successful Preview has been completed the overview appears on the screen showing all the thumbnails and I can usually scan/batch scan OK.
Using the Multicrop feature of Vuescan can be quite frustrating but the simple approach seems to be -
Crop >Multi crop set to 35mm Film
Crop > Crop size set to Manual
Crop > Show multi outline set unselected
Crop > All frames set unselected
Input > BatchScan for List
Input > Batch list set to frame pattern (eg: 1-4,7-10,13-16,19-22)
Once the Preview Overview is available then each frame can be selected and optimised for rotation/cropping/color/exposure
For my machine I find that the scan height of 3.5mm for the filmholder is about the sharpest so I place the height stubs pointing to the + sign.
o - 3mm
+ - 3.5mm
no stub - 2.5mm
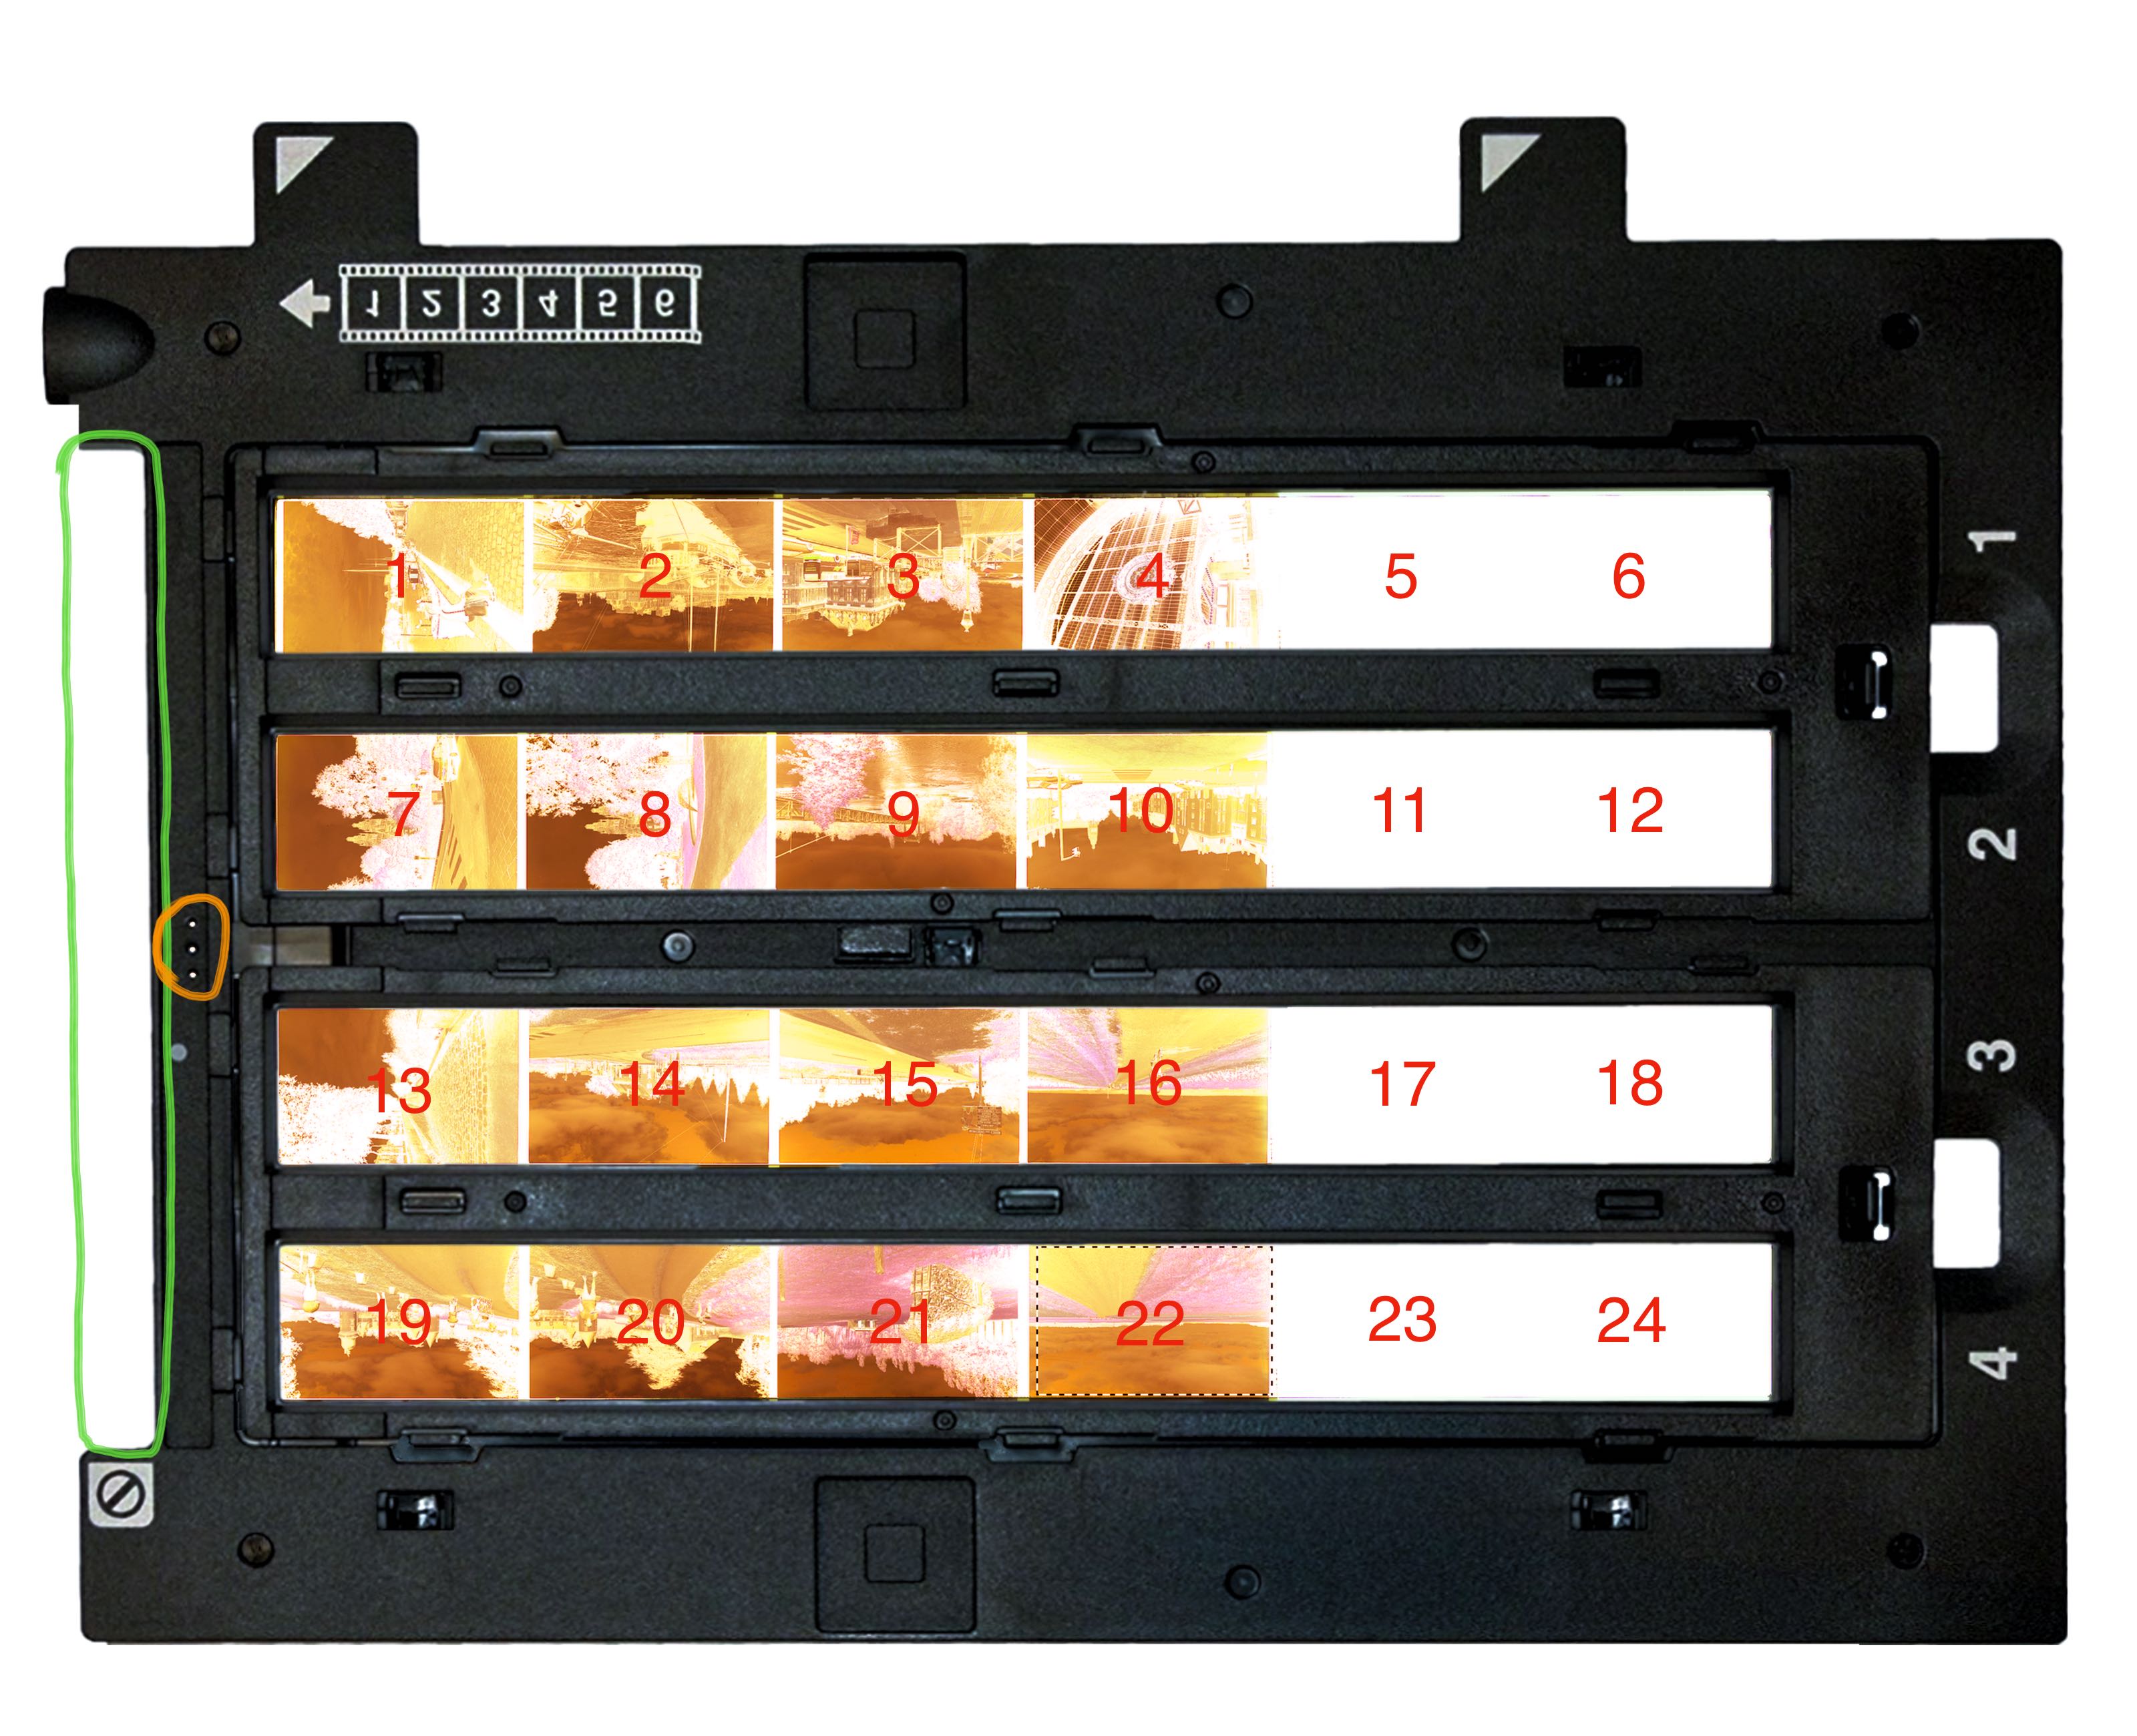
If all four neg strips have 4 images then the batch list setting will be List and 1-4,7-10,13-16,19-22 with the neg strip matt side up (side of FH with all the number markings).
Typical scan timings -
16 neg batch takes 52 mins so 3.25 mins per negative - this includes warming lamp time (V800 will be quicker because it uses LED).
Task - 3200 dpi scan, 24 bit RGB, 3 samples, 2 pass (1 for scan/1 for IR light clean), light sharpening.
Need to add time for preliminary setup of batch (crop alignment/colour/rotation/etc)
I found that the batch mode will step through 24 negs sequentially but will assume 6 negs per row in the Epson holder however since the neg strips tend to be cut in groups of 4 I can only do 16 in a batch.
Some preliminary adjustment of the crop positions will be required as the middle spacing between the holders is larger than the spaces with the holder.
Typical batch -
4 strips of 4 negs in Epson filmholder (each row will take 6 but neg strips tend to be 4 at least in my experience of photolabs - consumer grade)
V700 scan order -
The FH (filmholder) has the neg order marked but the neg order may not be the same if the film strip is placed matt/dull side up in the FH as recommended.
The neg order may vary depending on the camera model -
eg: Contax T3 film loads from the right side and auto advances from 0 whereas XPan loads from the left side but is wholly advanced onto the takeup spool on loading then returned progressively into the canister as each image is shot (ie: the first image on a 36 shot roll will be 36 rather than 0 or 1).
The batch always starts from the nominal 1st image so some renaming may be required at some stage if sequences are used.
In my case the batch list order will be 1-4,7-10,13-16,19-22 missing out the extra 2 neg positions per row.
Important Note:
Options within Vuescan will appear/alter in realtime when particular options are set or there is a hardware dependency (eg: type of scanner). This is relevant with batch mode - if the settings for each frame are adjusted with Input > Batch Scan set to Auto if the Batch Scan is changed to List then all the frame settings will need to be checked/redone. It is a matter of practice to get the right order of working.
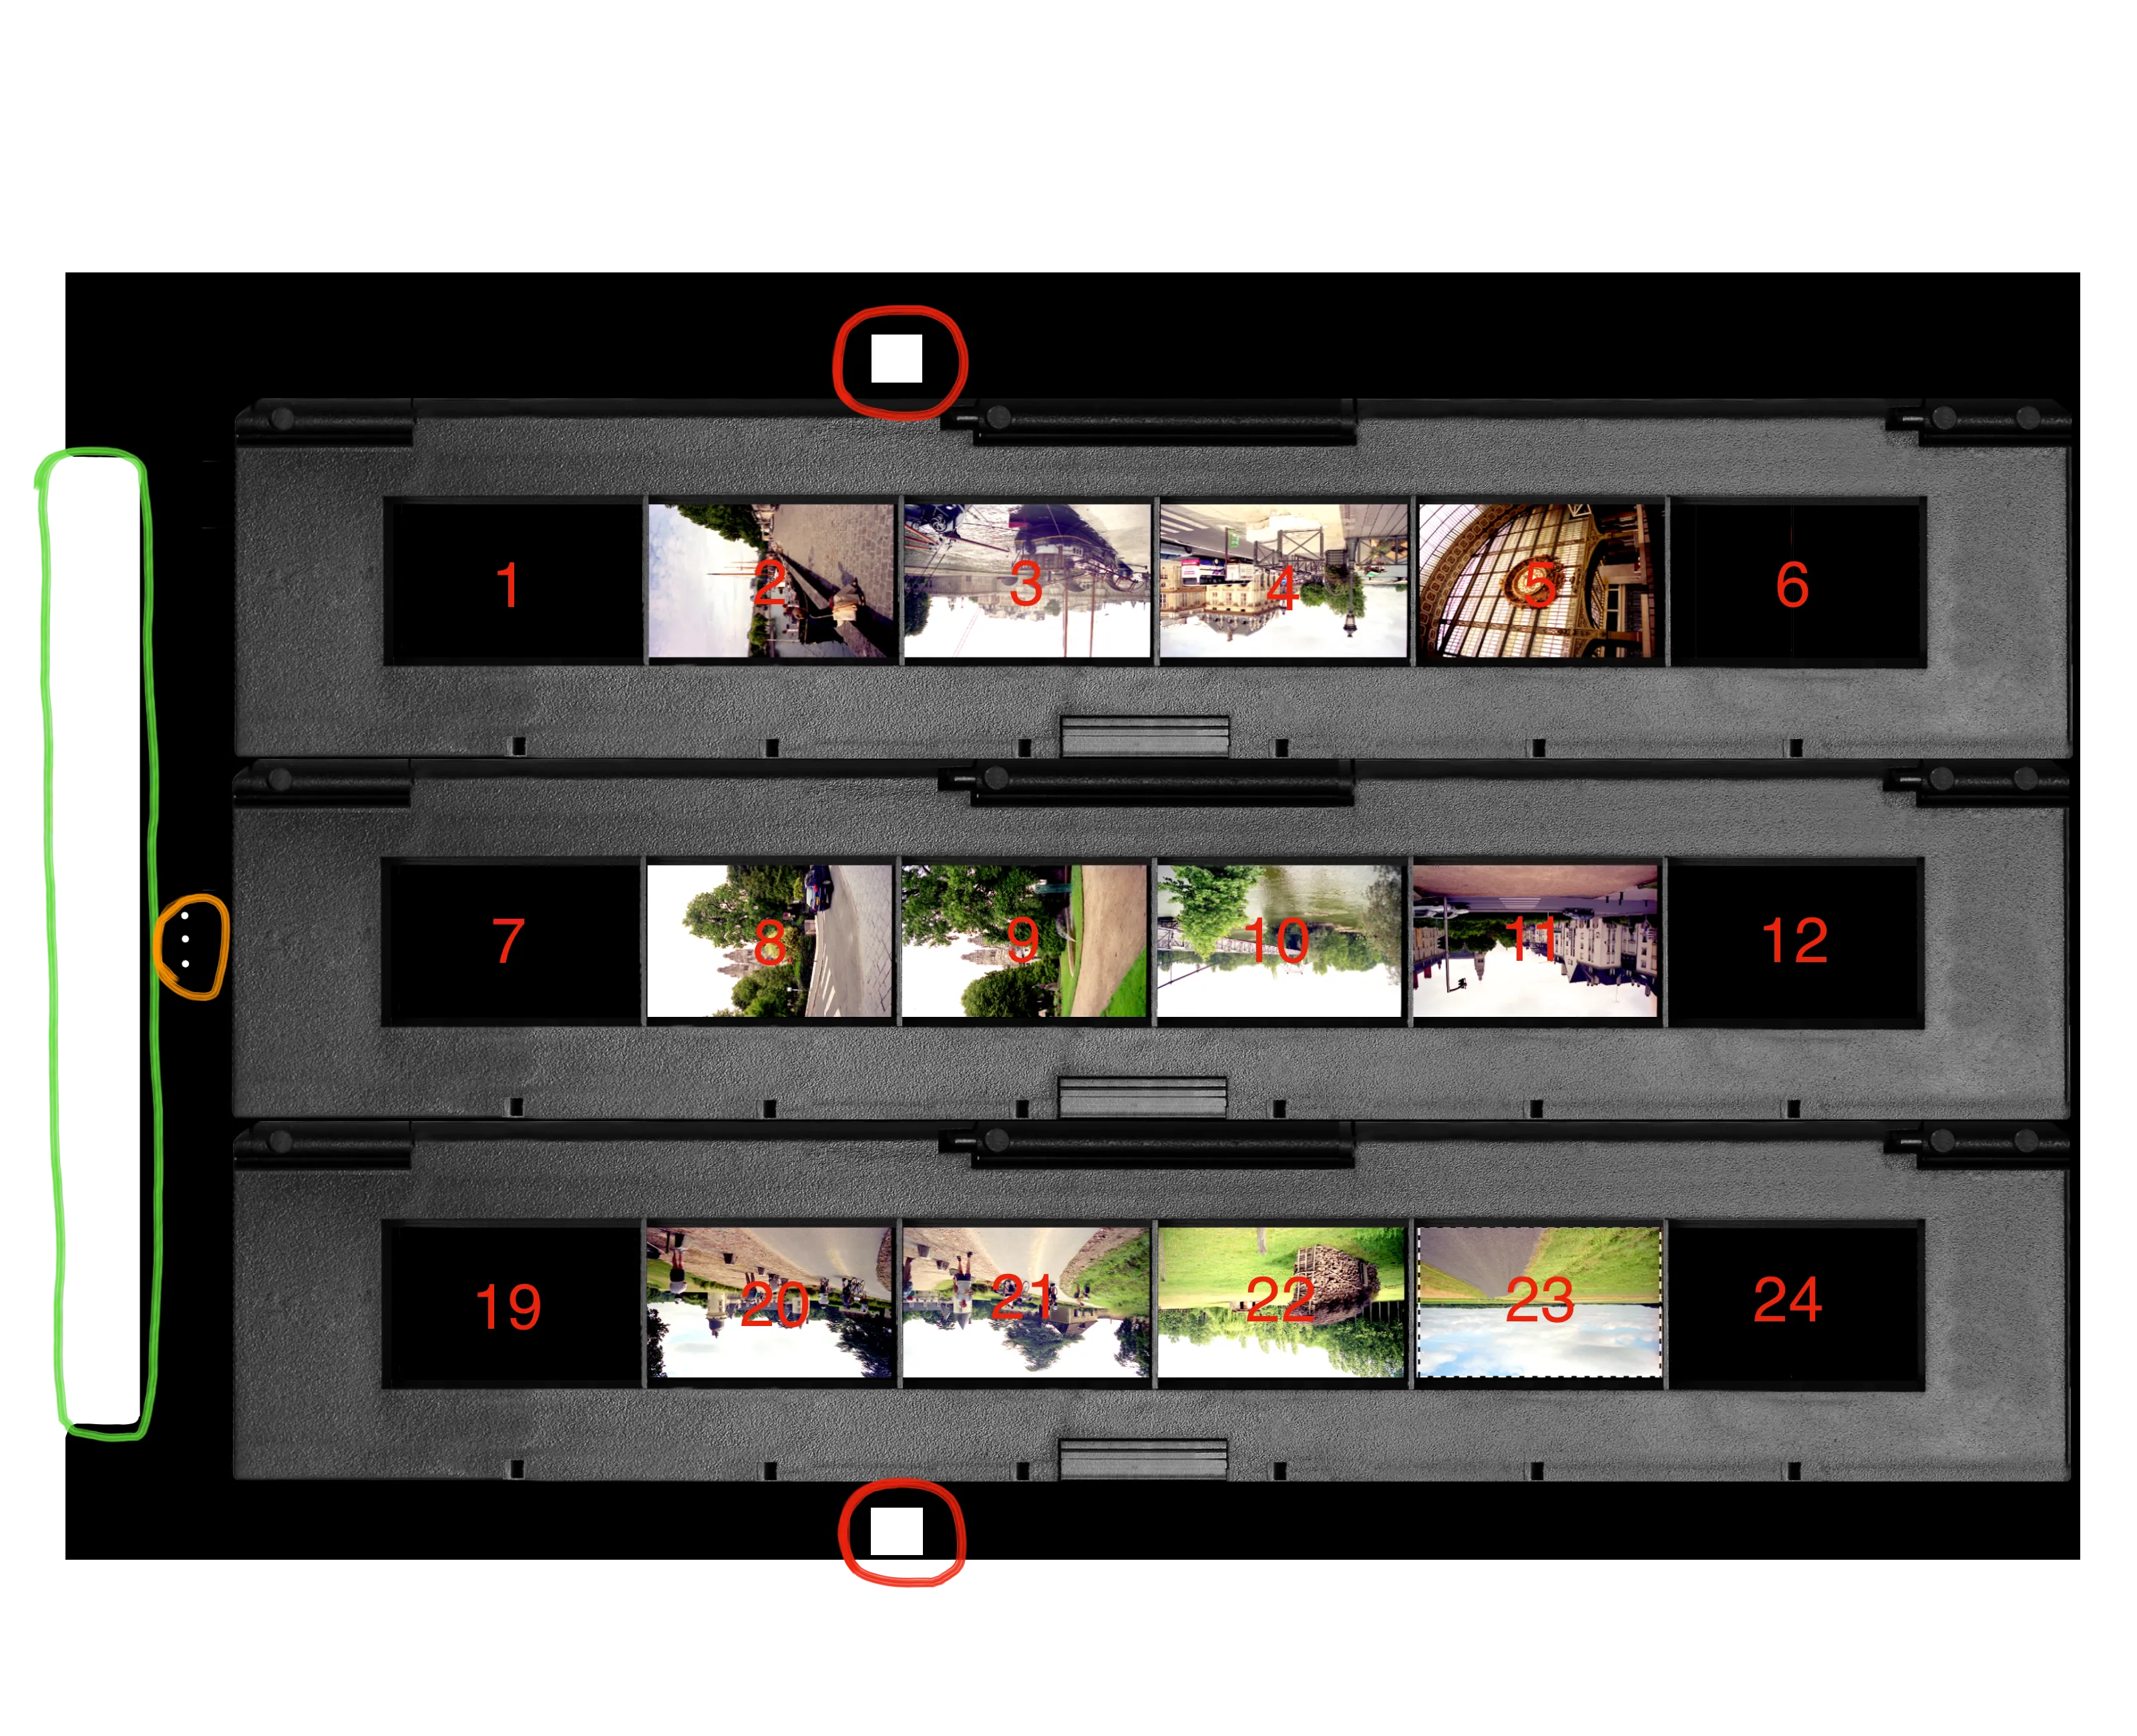
Film holder for 35mm negatives showing frame numbering (height adjustment stubs circled in red) -


:: Settings ::
For me the Color Balance ==> Auto Levels works with minor adjustments to the color brightness.
I find that the builtin negative profiles for Vuescan don't always suit eg: Kodak SUPER GOLD 200 Gen 4 works better for Kodak Proimage 100-4 films. This could also be a way of digitally cross-processing films to get a desired effect eg: in the film days some Kodak users preferred Fuji processing and vice versa.
I output my scans to TIFF as I want to emulate the RAW image and have the ability to edit within Lightroom or similar. Unfortunately the size of the TIFFs are larger for the same quality than a RAW from a digital camera would be but 3200 dpi scans are good enough at c. 32M.
I tried some scans using 6400 dpi but the file size was massive and I couldn't really see any perceptible difference - 32M vs 135M and that is with LZW compression. The biggest difference in scan quality appeared to be with the XPan scans but then the Hasselblad was essentially a Medium format camera with Medium format Fuji lenses which were pretty good.
On balance the batch scan mode of Vuescan works pretty well but time needs to be spent setting up the batch . If the scanning is being attended then it can be just as quick to just shift the crop window to each neg thumb, do the adjustments and then scan. A few years ago I found the Canon FS4000 scanner good but too slow and the V700 gives me results that are not too bad in comparison at a far quicker speed.
The infrared noise cleaning on Vuescan is very effective.
The V850 model looked interesting since it uses LED lamps so is faster and apparently the image quality is a shade better but it also costs about 3x what I paid for the V700 so I will live with the troublesome lid on the V700.
Using the Epson 35mm filmholder I find the major drawback is the curling of the film can still be an issue and the heat from the lamp doesn't help. I've found that putting some 2cm lids under the top lid provides an air gap to assist cooling and the fact that the lamp is a bit further away doesn't appear to affect the scans (I guess a fan could be used to actively cool the film in this case but I have gone that far yet). It wouldn't be a problem if the filmholder had dividers between the frames but I suppose they were omitted for versatility.
All the trials and tribulations of scanning old negs certainly shows the benefits of digital cameras that produce excellent "out of camera" jpegs - basically the camera is doing most of the work that the photolabs used to do and with better results (consumer grade of course).
Good info regarding Vuescan usage -
https://andnow.me/photography/software/scanning-negatives-with-vuescan/
http://mclements.net/blogWP/index.php/2019/12/25/vuescan-multi-crop-how-to/
Note on resolution:
Looking at the forums there is quite a bit of info regarding scanning with V700/etc and also quite a bit of conflicting information regarding what resolution the V700 is capable of - so I did a bit of testing to see what is what.
It should be noted that Intel style clean rooms/space suits/dust extraction fans/drum scanning/good eyes are all out of my league and I tend to scan to consumer grade.
Basically using dpi as Vuescan does I tried the maximum of 6400dpi (it would not allow me to use 9600) along with 4800/4000/3200/2400/1600, 6400 with 2x reduction giving 3200.
Well it seems that the V700 using 6400 (max. optical resolution) will give good detail far better than at 3200 however at a much larger file size. The difference was only noticeable however when pixel peeping so for me it would seem that sufficient detail is being recorded with 3200. I tried the Multi-sampling and set the Number of Samples to 3 and it did seem to improve the detail/sharpness of the scan and the file size was a bit less than with the multi sampling. This would appear to confirm that the scans are in fact a bit 'cleaner'. If I did a 6400dpi scan reduced to 3200 the file size was about the same as the 3200 scan but I did think the detail was a bit less so not really worth the extra scan time.
I think if I was going to do a larger one-off print of a good neg then the V700 will definitely be worth setting to 6400 for the better resolution but for a collection of negatives it becomes a trade off between time to scan/process, desired viewing size/resolution and file sizes so on balance 3200 dpi seems to be OK maybe 4000dpi at a pinch. If a very large file size was acceptable then a higher dpi scan would be worthwhile if the intention was to do a later crop and retain the original scan (otherwise just crop at scan time and use normal dpi).
There is certainly an argument/evidence for saying the effective DPI of the V700 is only about 2300 which may very well be the case but my experience is that the higher DPI will resolve more just that it won't be visible if viewed at a particular size. I also find that once the grain becomes perceptible in film scans then any further increase in resolution is rather pointless and any sharpening just acts on the grain rather than just the detail of the image - this shows the advantage of an image taken with the human eye with a good amount of processing intelligence behind it, there is no grain.
This snap shows the difference between a 6400dpi image and a 2400dpi (click for large snap) -
6400dpi vs 2400dpi
Note: With the snap on say a 27" screen normal viewing distance ( c. 60cm) will show the resolution difference clearly but from 3 or 4 metres the difference is minimal. This demonstrates to me that the optical resolution of 6400 for the V700 is in fact true but whether or not it can be seen as different from a lower resolution scan (say 2400) depends very much on the viewing distance of the image.
Some numbers -
IRD - Scanned TIFF saved via Iridient Developer using LZW and Zip(max).
Vuescan output set for Fixed 300dpi 24bit tiff.
Note: It pays to be careful with how the image is processed with various programs as the file sizes can vary markedly.
An example of this was a 4000dpi image I scanned with Vuescan -
Scan file --> 59.6M uncompressed
Scan file --> 47.3M compressed (LZW?)
Preview (slight crop) --> 54M (file size increased! you pay for the ease of cropping with bigger files so get the framing right in Vuescan!)
Iridient Developer (sharpen/denoise) --> 38.9M LZW compression (using the compressed scan file)
Iridient Developer (sharpen/denoise) --> 35.3M Zip maximum compression (using the compressed scan file)
:: More Stuff ::
I have decided that using the standard Epson V700 35mm filmholder is not a perfect solution mainly because film curl can occur since all the edges of the frame are not clamped. There is a lack of rigidity in the filmholder also.
The V800 uses glass inserts to flatten the negs but I want to avoid introducing another layer of glass so want to use a holder that has dividers between the negs which tend to hold the film reasonably flat.
With this in mind I have tried some other types of holder.
Using other holders in the V700 can be very problematic since the scanner is setup for the supplied holders so my approach has been to simulate the 35mm holder with some black card placed on the glass as a template. I obtained some 400gsm card which has a thickness of c.0.47mm
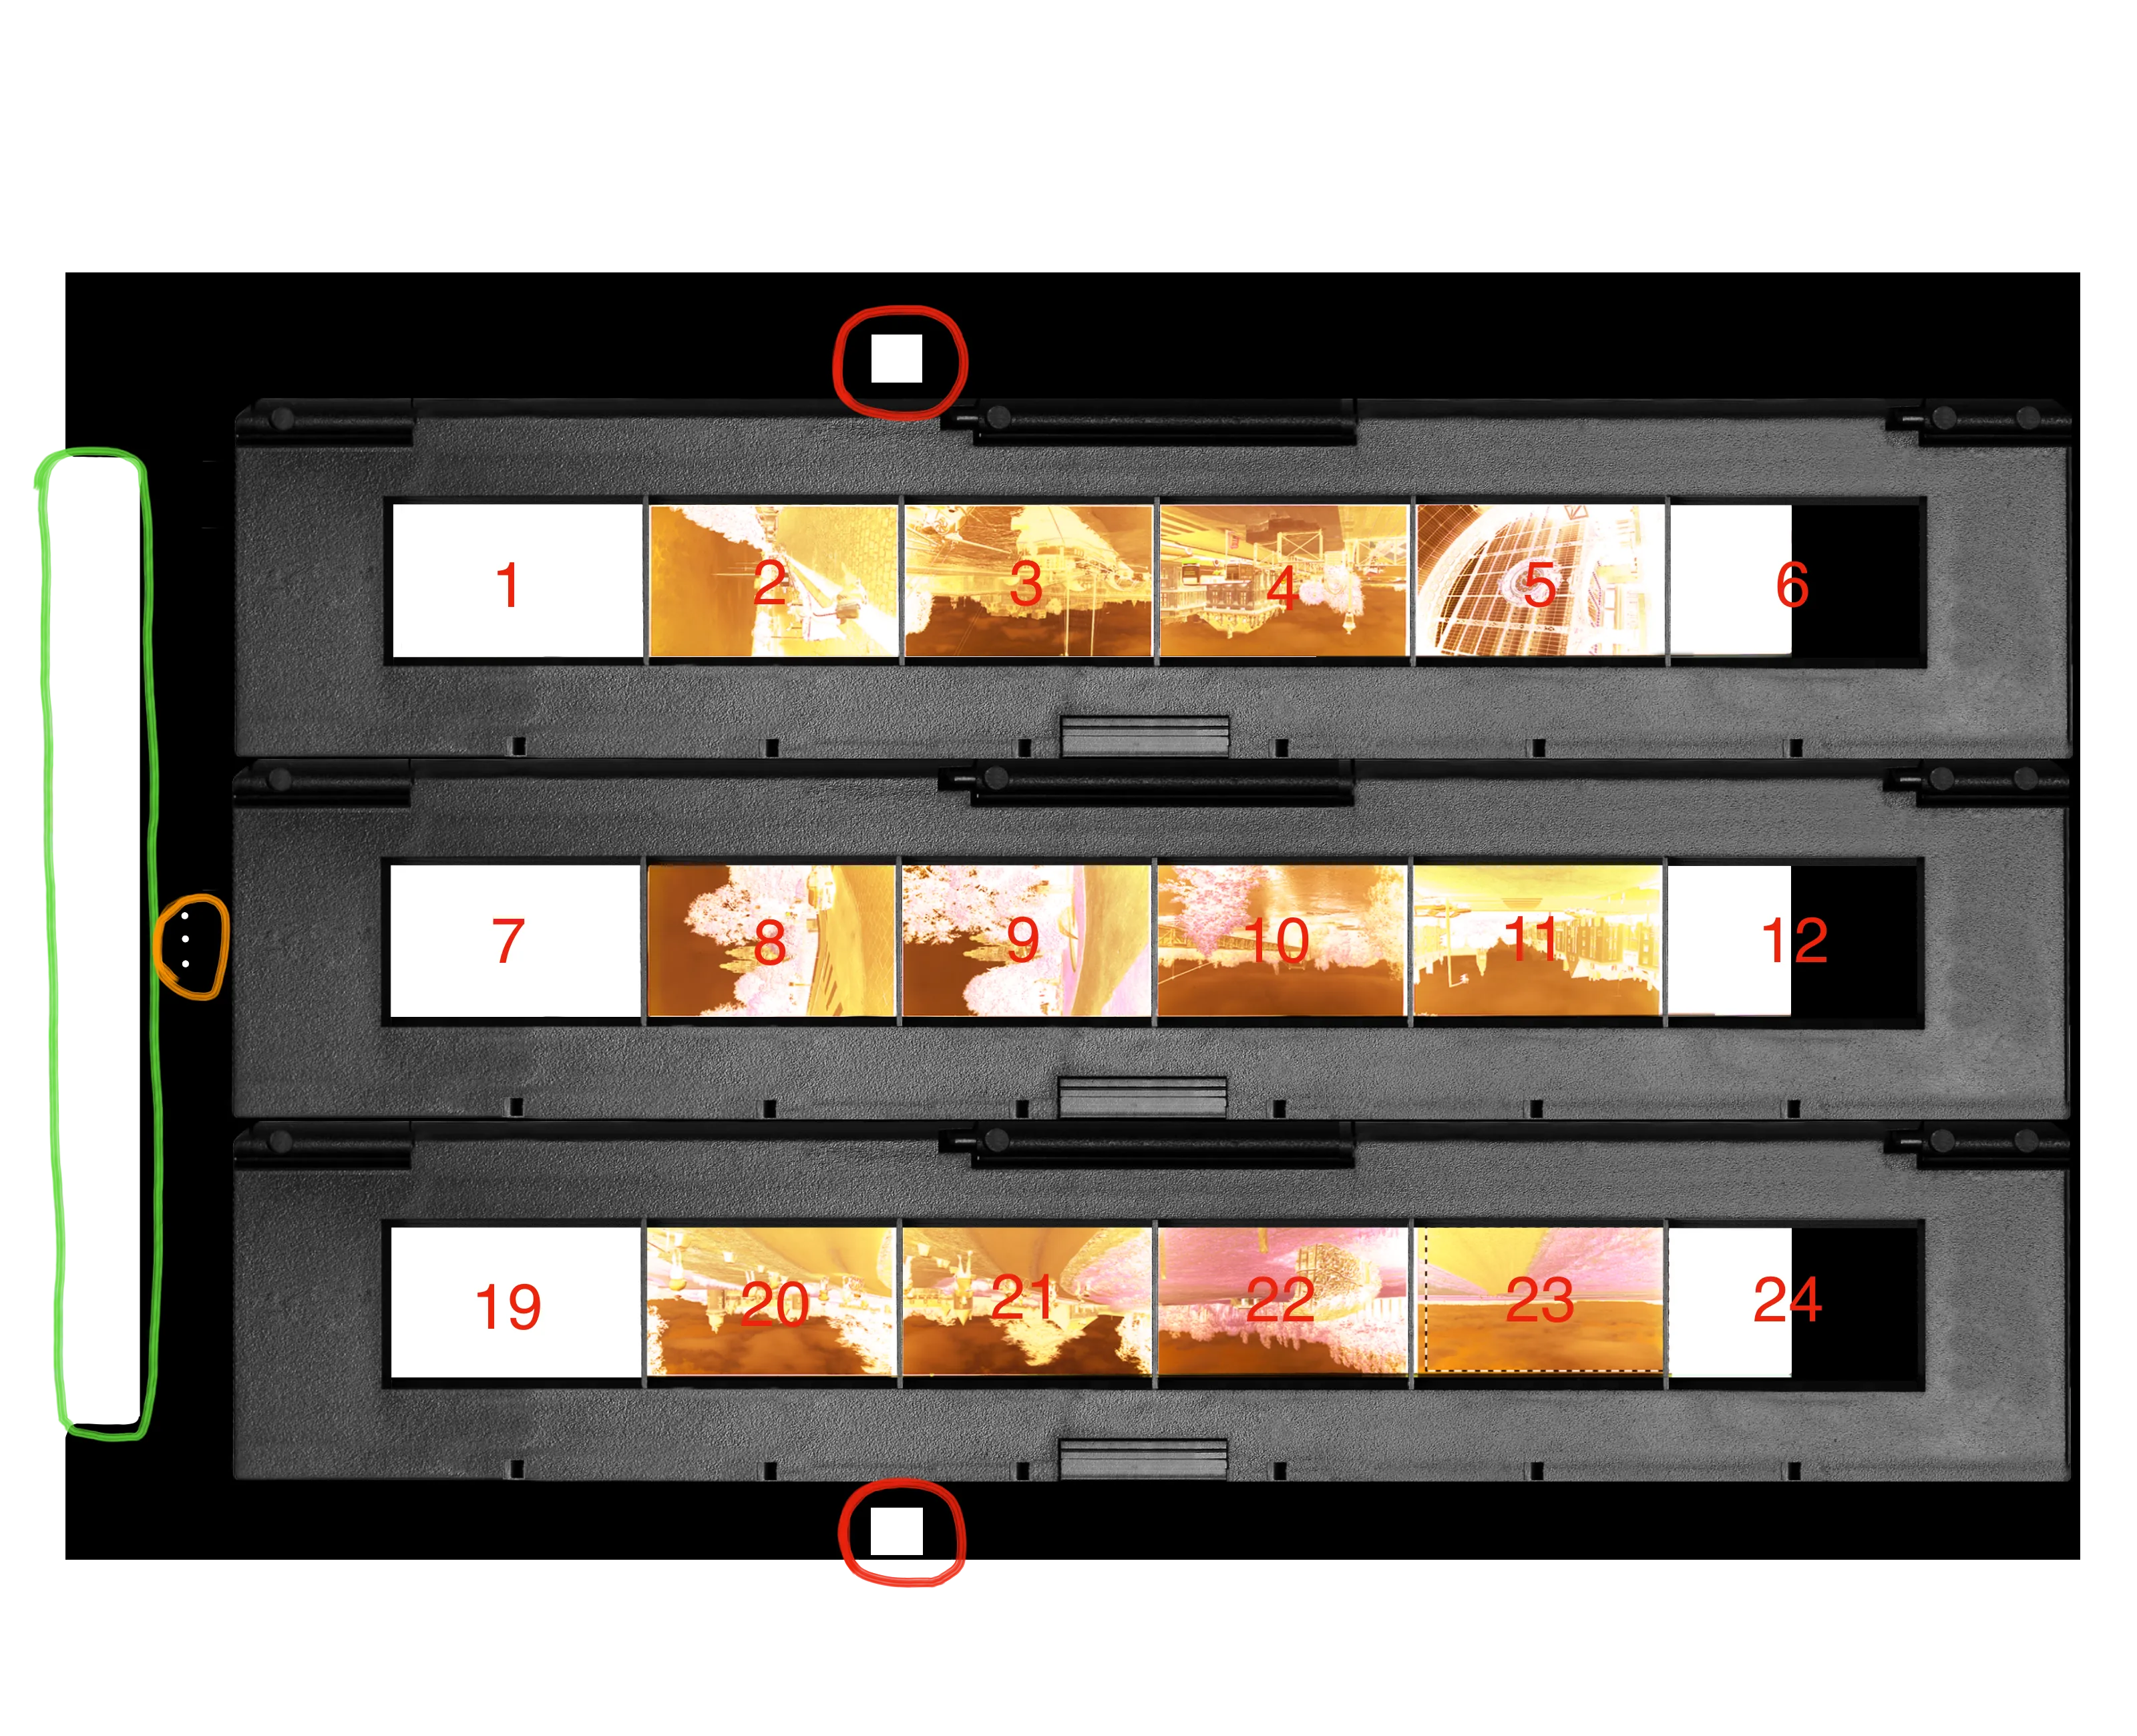
The template is designed to simulate the standard FH. There is an area at the top of the scanning area (hinged lid end) that must be left clear and is marked as such on the standard film holders. Each FH also has some small holes in a pattern which identifies the film holder type. The 35mm holder has 3 holes in a row and the manual suggests that these are not covered.
On the underside of the standard FH are two white squares used for auto-scan registration - these could be included in the homemade template but I haven't found it necessary at this stage.
If the film holders are unmodified I can include the first five frames of each holder within the scanning area so giving 15 frames however all my neg strips are cut in fours so I can do a batch of 12. Typically I would set the neg strip in frames 2 - 5 (this makes it easier to position the strip within the holder when loading).
Using the Batch List method in Vuescan the first strip would be 2-5 and the third strip would be 20-23. The middle strip straddles the area of the two middle strips in the standard FH so the frames could be either 8-11 or 14-17. The automatic frame location in the V700 is set for four strips however if trying this on a V800 it might actually work better since the standard V800 film holder is 3 strip. Unfortunately the V800 3 strip holder still doesn't use dividers but glass instead.
An example of holder type identifiers -
Film Holder type
An example of Preview failure when using the JJC film holders and the curved ends were intruding in the restricted area -
Restricted Area
An example of Preview failure when using the JJC film holders and the curved ends were intruding in the restricted area -
Restricted Area not clear
The V700 lens is fixed focus and the range of adjustment of the standard FH is 2.5mm to 3.5mm - mine seems to work well at 3.5mm
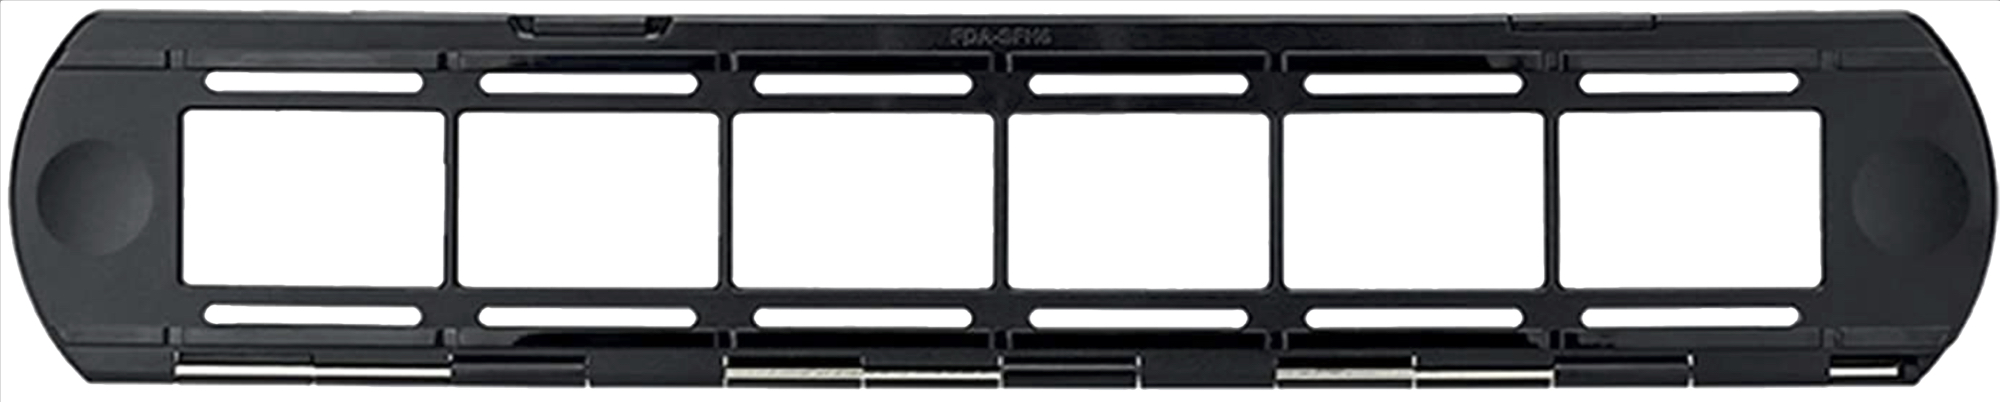
An example of the standard V700 35mm film holder (4 strip) -
Standard film holder
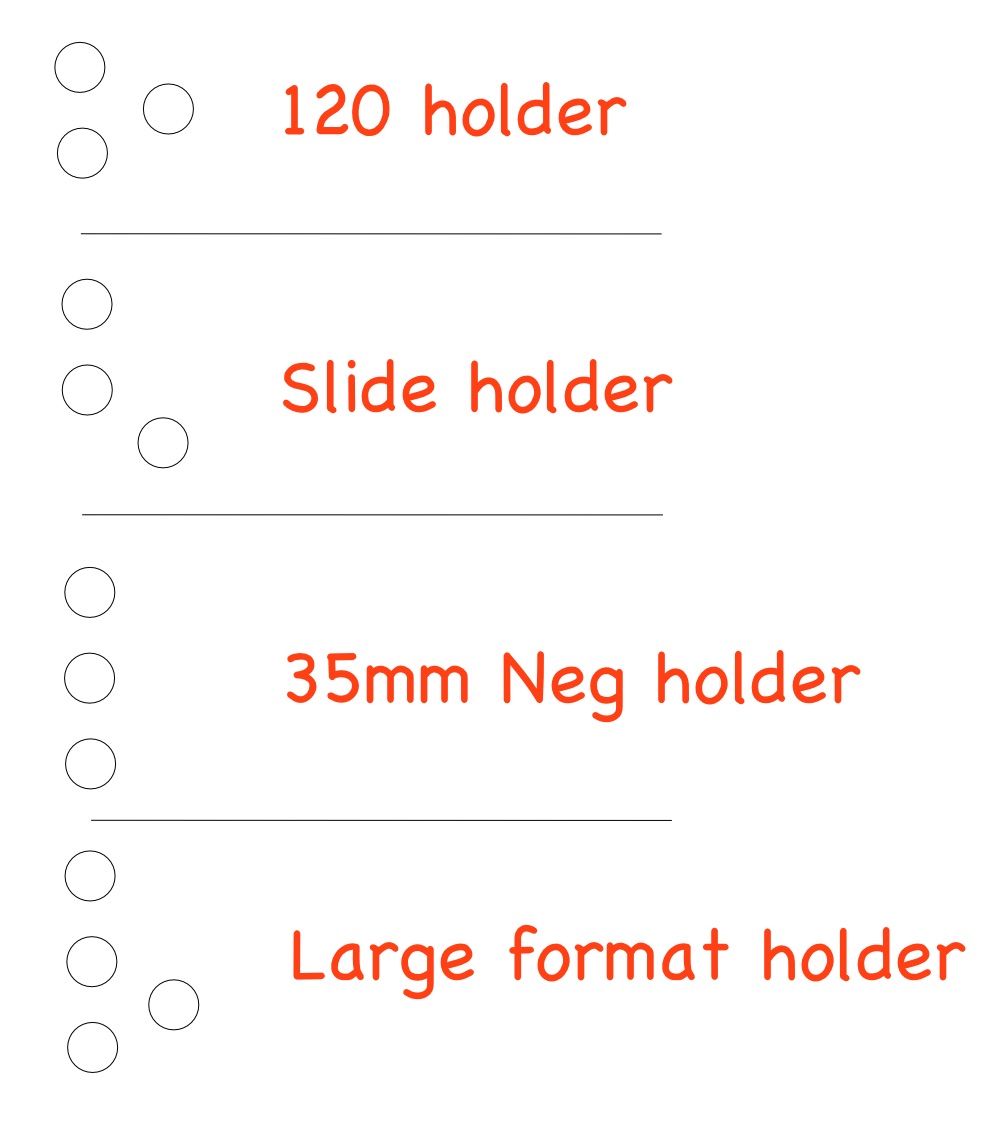
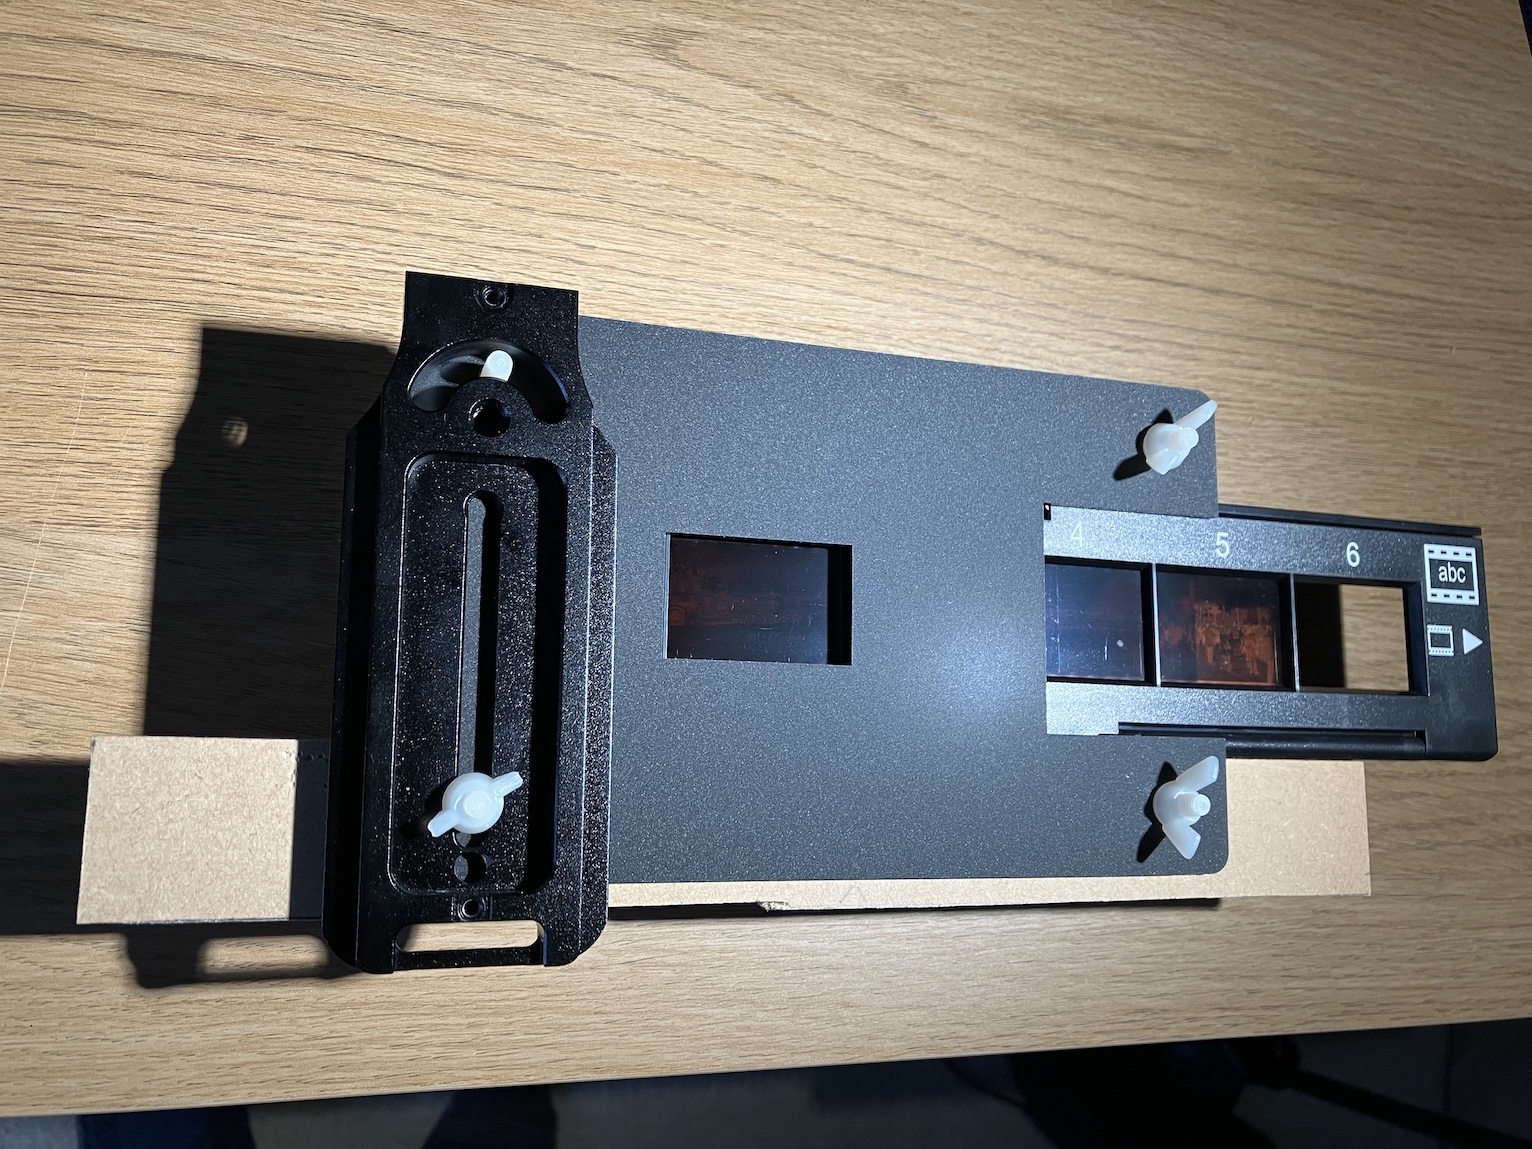
ABC holder
There are two variations of the standard ABC 6 frame filmholder - one has notches below the marked Frame Numbers and the other is without notches. The notches in this scenario can produce coronas from the file sprocket holes on the scanned image so it is best to use the notchless variety.
Sprocket hole corona
ABC Notched film holder
The ABC holder is c. 6mm thick (c. 3mm from glass to film plane) and since my V700 seems to have optimum focus at 3.5mm this holder will work with a 0.5mm filler (which happens to be the thickness of my template).
The holders are flat so there is no drooping along the length of the holder and they don't require the lid to hold them flat so I just prop the lid up with some 2cm inserts - this is a wheeze to reduce the heat accumulation above the negatives and the light is still OK for the exposures.
An example of the card template with the ABC holders -
3 Strip template
The white squares circled in red are normally on the other side of the standard FH facing downward into the scanner toward the sensor. I don't use these on my template but they are just shown for reference.
The ABC holders are offset to avoid obscuring the type holes and this means that the sixth frame can not be used. With careful engineering the holders could be modified to accommodate the type holes and then allow the sixth frame. A further mod to the card template would be to fix a thicker piece of card around the holders to assist with alignment, also the 3 template slots could be widened to give a little wiggle room if necessary. If the optimum focus of the V700 happens to be 3mm rather than 3.5mm then the template could be modified to accommodate the holders directly on the glass otherwise a thinner holder type would be necessary (JJC or Kaiser).
Typical batch using the card template with the ABC holders -
3 Strip template
Using the four middle frames eases the neg alignment on loading - batch list will be 2-5, 8-11, 20-23. The V700 frame numbering will depend on how the batch option is set (Auto/List/etc). On Preview the middle strip will be shared by frames 7-12 and 13-18 so I tend to use the 7-12 range.
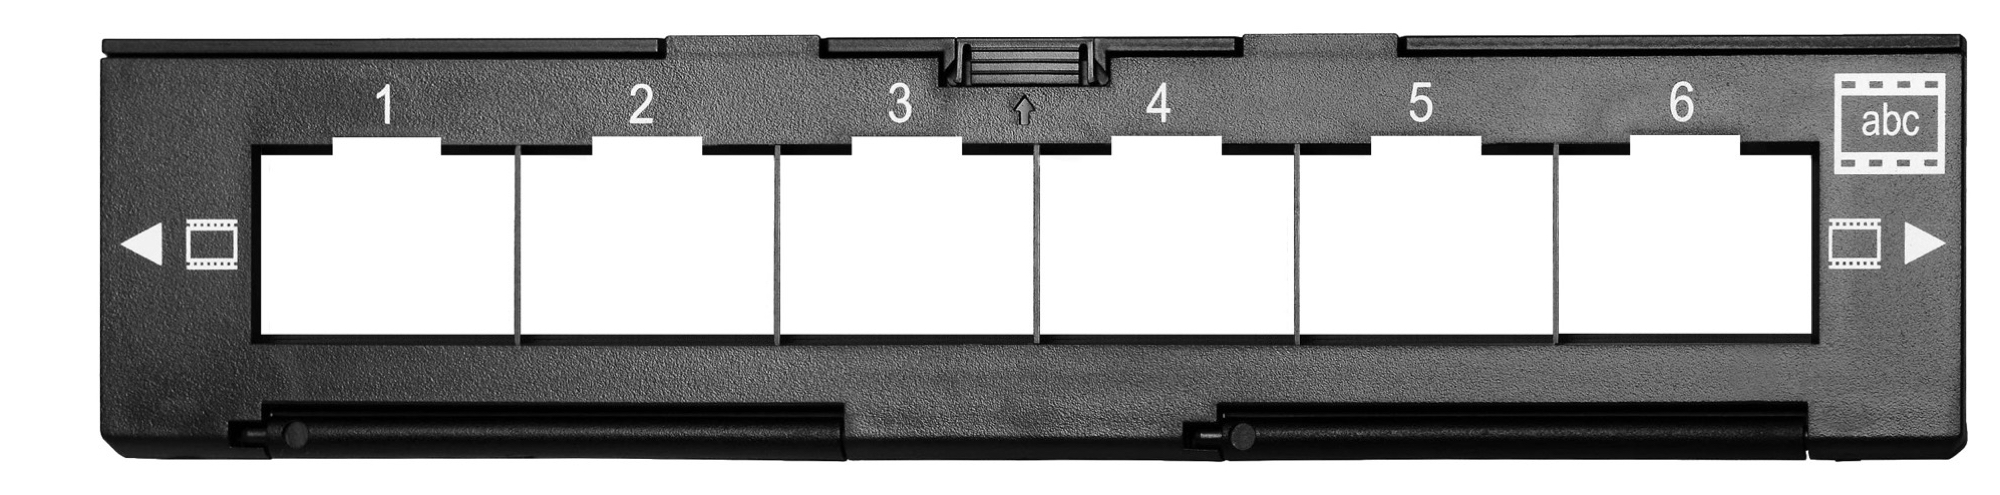
JJC holder
The JJC FH has convenient apertures that will show the film type information and frame numbering that are built into the emulsion. The holder is thinner than the ABC at c. 4.7mm (c. 2.35mm from glass to film plane) so may be more suitable for some V700 scanners.
JJC film holder
The height of the alternative film holders are such that I can only use three at a time and with 4 negs/strip that means I can batch scan 12 frames at a time which is OK. I guess if you are handy with a hacksaw then it may be possible somehow to fit four side by side and emulate the layout of the original FH.
Scanning 35mm film with Leica CL
Scanning Negatives
Another way to digitize old 35mm film negatives is to use a digital camera and 'snap' the film. I was trying to see if a slightly better result using this method could be obtained - the V700 scans can be pretty good but I find the scanners are just not quick enough and suffer reliability issues.
As a point of interest I actually tried another scanner type (Pacific Image XEs) which provided more detail than the V700 but a lot slower and then after c. 27 scans it went pop. The XEs is a rebranded Reflecta ProScan 10T.
So I have decided to replace the scanner with a decent macro lens and a few other bits and pieces.
The setup:
- Leica CL (24 Mpx/ 1.5x crop)
- Sigma 70mm DG Macro Art lens L mount
- Raleno PLV-S116 Soft Light (CRI95/ 5600K)
- Essential Film Holder
- Koolehaoda 480mm Rail Nodal Slide Camera Bracket Mount (Arca-Swiss compatible)
- Various Arca-Swiss pieces (Worm-screw rail/rightangle rail/etc)
- Giotto Rocket Blower (try to minimize dust on neg)
I have tried a horizontal layout for the copying jig rather than the more normal vertical copy stand approach hence the Rail Slide. Should a vertical arrangement be desired then something like a Reprostativ Bausatz schwer Höhenverstellbar from Dold Mechatronik might be the business (not too expensive).
The negative is shot as a DNG with the CL (using self-timer) resulting in a 6000 x 4000 24Mpx frame of c. 45M in file size.
With the scanners (I used Vuescan software) the negative inversion is done by the software with the added advantage of infrared cleaning so getting a final TIFF wasn't too much work however with the camera method a bit more work is required but tons of options.
The main trick using the camera method is the negative inversion along with the film colour cast issue but the elephant in the room is the lack of automatic dust/artifact cleaning.
:: Options ::
LightRoom:
I've been trying to move away from LR since the subscription nonsense but the Negative Lab Pro plugin is quite effective and works on the old 6.14 perpetual. Resulting files can be exported as PSD/JPG/DNG.
Capture One:
Manual inversion is possible with Curves/Levels and multiple spot cleaning is in Beta with version 23. However the beta of the dust cleaning appeared to be too complicated. Resulting files can be exported as TIFF/JPG/DNG.
Vuescan:
It is possible to scan the DNG file with Vuescan which will do the negative inversion if desired and works quite well however the infrared channel is not available (scanning the camera image) for the cleaning stage. Resulting files can be exported as TIFF/JPG/DNG
Raw Therapee:
Iridient Developer:
This works well for me as it has a Negative Invert checkbox and then it is not too hard to get a result with exposure and white balance control.
Resulting files can be exported as TIFF/JPEG/JPEG2000/PNG/PSD/HEIC. Just for fun I tried processing the OOC JPG from the CL and it was comparable to the DNG RAW.
Pixelmator Pro:
Found this useful for the dust cleaning function which has to be done manually without a scanner - the healing brush is very easy to use and the results are good. In fact the ease at healing multiple spots manually is far and away easier than any other app I've tried - it just works!
I find the approach to spot removal by Lightroom/Capture One et al just seems to be a cloning type arrangement that involves a human decision for every spot whereas the Pixelmator approach seems to work most of the time with the occasional bad heal. The only software I've seen that betters this is the SRDx Plugin which unfortunately only works with Photoshop.
Resulting files can be exported as TIFF/JPEG/JPEG2000/PNG/HEIC.
Prior to obtaining the Sigma macro lens I tried some rudimentary shots with some Viltrox extension tubes and the TL 18-56mm zoom lens with a Marumi +5 closeup lens attached - the detail was OK - enough to suggest the macro would be worthwhile obtaining and it does indeed look to be superb. The detail so far appears to be at least as good as the XEs scanner if not better and certainly better than the V700.
:: Workflow::
At the point the DNG is taken of the film negative it is effectively the archive master (Development stage equivalent to RAW in the digital world).
The DNG can be used by a variety of programs to process the negative and produce an output image (printed or otherwise).
For my use I find that good results can be obtained with Vuescan/Capture One/Iridient Developer/Pixelmator Pro depending on what needs doing - all will save to TIFF
A major consideration is that the DNG negs will probably need dust/scratch repair which of course a scanner will do using the InfraRed channel so my tool of choice for this is Pixelmator Pro as the Repair brush is so easy and quick to use. For the inversion and colour processing both Vuescan/Irident Developer make it quite easy with Vuescan allowing quite a number of built-in filmtype profiles. Capture One is a bit more manual but with practice seems to give a good result.
A point to note is that if the negative DNG is retained as an archival RAW then finished TIFF files can be converted to lossless HEIC in the MacOS ecosystem and this saves a lot of space in terms of file sizing.
eg:
Using C1 - DNG 48.1M, TIFF 55.3M, HEIC 11.8M (lossless)
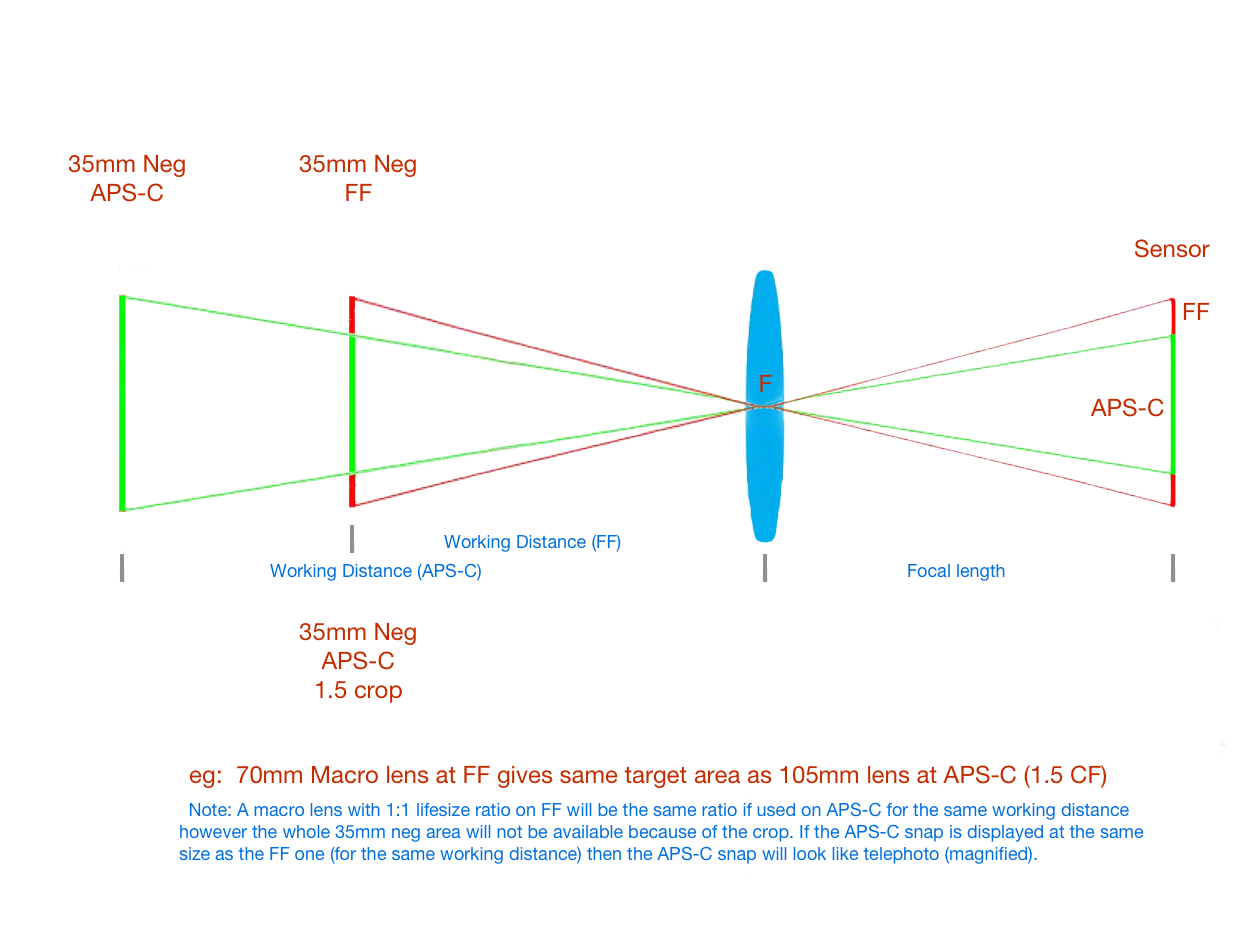
Macro diagram -
the Sigma lens is a FF lens and is capable of a 1:1 magnification ratio at 70mm on FF so on the CL with 1.5x crop the magnification ratio is less than 1:1
Macro FOV
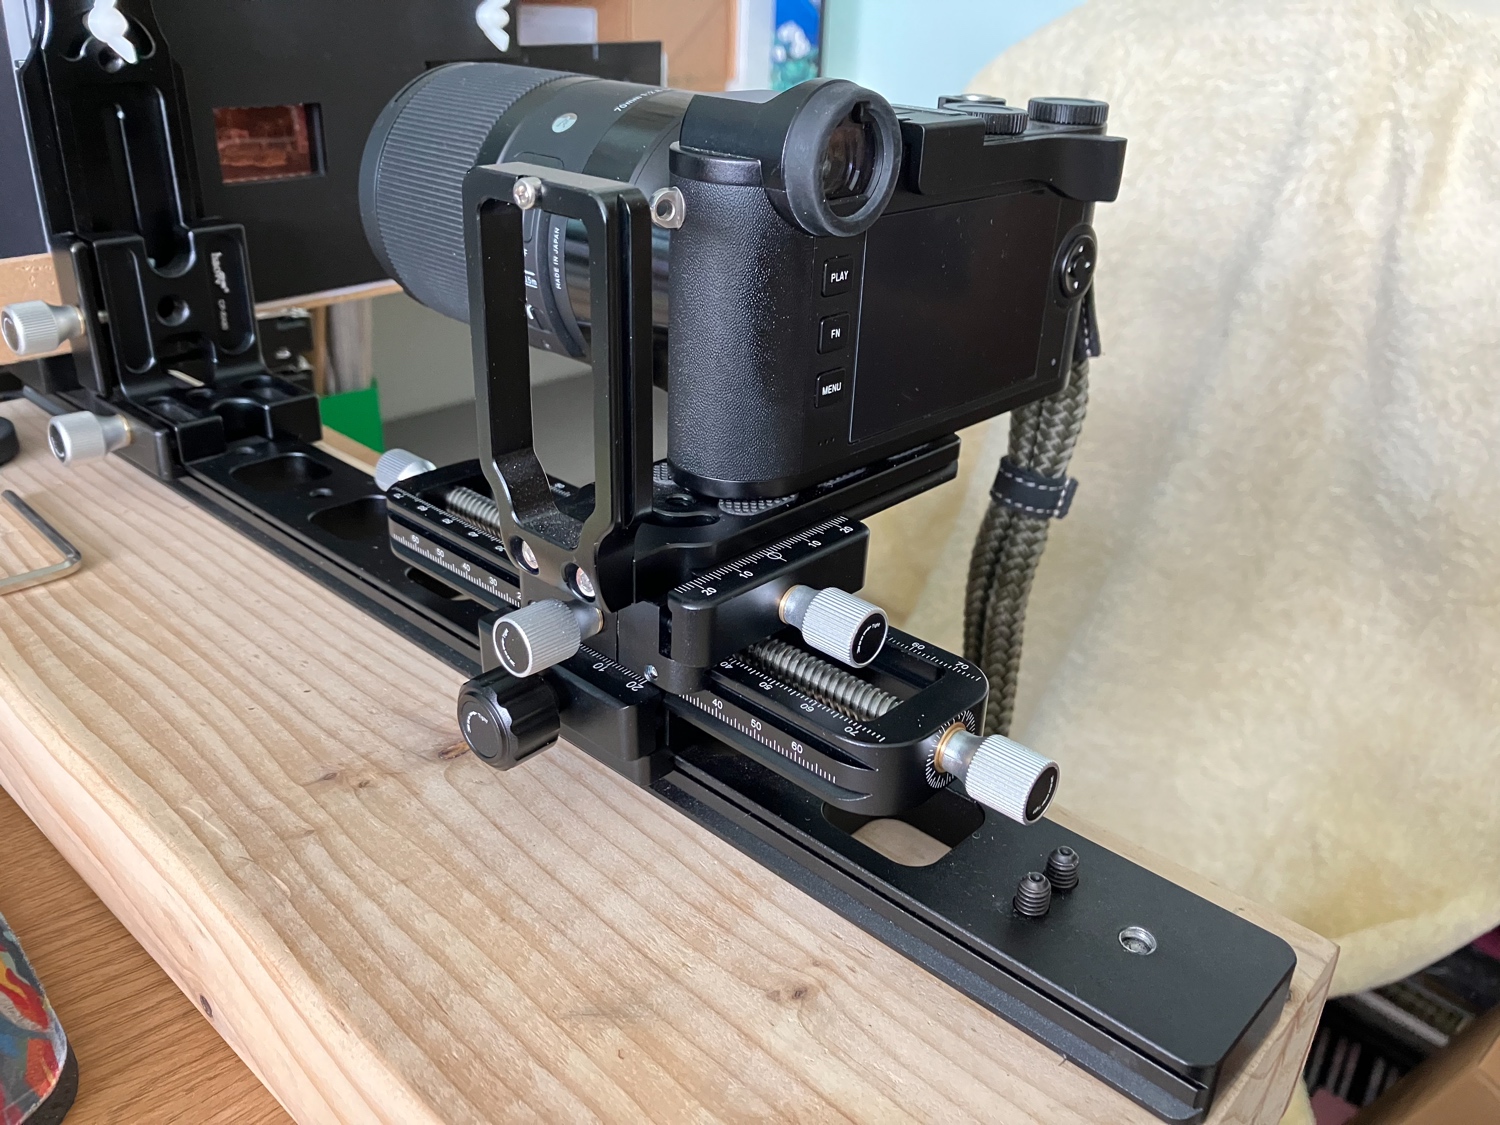
Macro Jig (Horizontal)
EFH Mod
EFH Mod 2
I have chosen a horizontal scanning arrangement rather than the more ubiquitous vertical arrangement and it uses a variety of Arca-Swiss compatible components - basically the main rail is screwed to a substantial piece of wood to provide a stable base. The rail is set to one side to allow the camera to overhang a bit so the battery/card compartment can be accessed relatively easily.
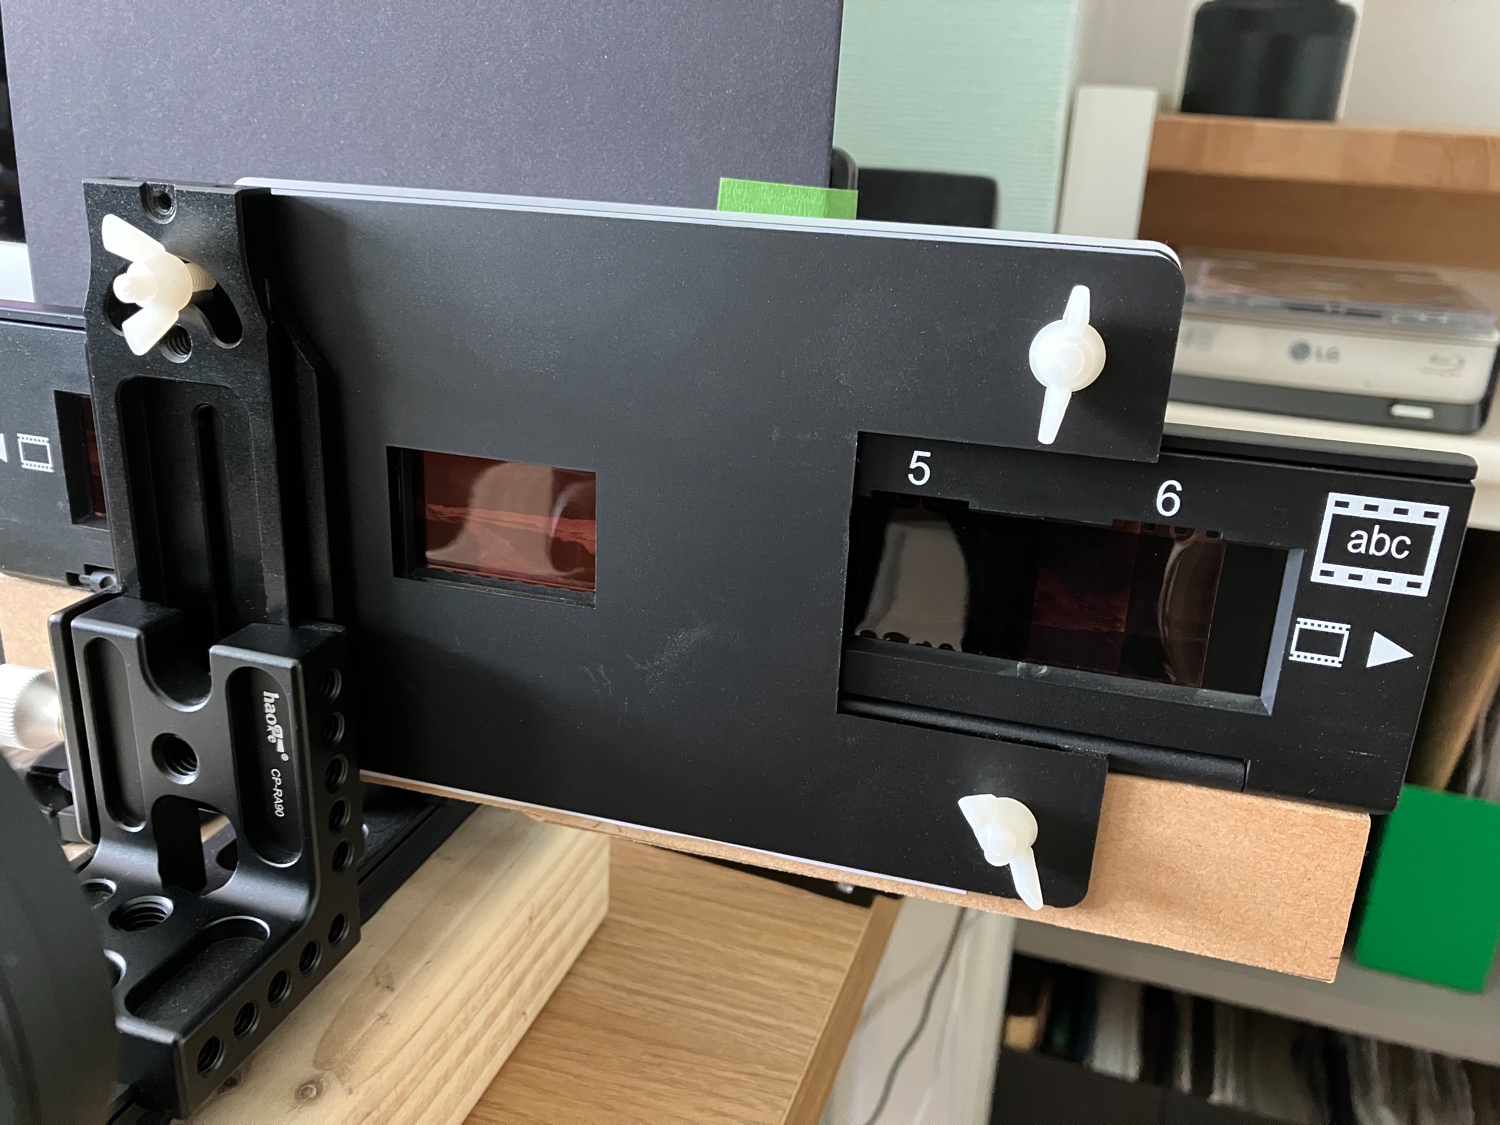
The Essential Film Holder (EFH) has been modified since I have found that feeding the film strip through was a wee bit loose - I prefer the film to be clamped and in order to allow quick frame changing I have adapted the EFH to handle a standard ABC type film holder. Basically I can now have about 4 or 5 film holders preloaded with negatives and then just feed them through the EFH.
Concerning the mod - the FH's are c. 6mm thick so I used a piece of 6mm MDF board of exactly the same thickness which allows the FH to move along the straight edge across the EFH 35mm window. The tightness of the wingnuts also controls the fluidity of the FH movement and paper inserts can be used to adjust the tightness of the FH movement. The EFH is held on the rail using part of an L plate fixed to a right-angle plate on the main rail. The 120 film template was removed as I don't need it which allows the existing bolts to protrude further assisting the mod.
The Raleno light source is fixed to the main rail directly behind the EFH using an Arca-Swiss type quick release fitting.
I can use either MF or AF quite easily with the Sigma lens - the lens is set to the 0.258 ~ 0.5m range and using the AF/MF switch will automatically set the CL to AFs or MF as required. In MF mode turning the large focus ring on the lens will produce the enlarged MF view in the CL viewfinder and allow the use of focus-peaking. Using the EVF rather than the LCD screen will allow a better indication of the frame sizing, once the frame size (and MF if used) is setup then the LCD is quite OK to use with the self timer and moving the film holders.
I have used a worm screw adjusting plate to assist with the focal length adjustments when framing the neg.
Using this setup I find that the AF is as good as MF so I tend to use AF - having said that my standard test photo is a legacy image which may/may not have had critical focus but is reasonably sharp so maybe MF should in theory be more accurate than AF. I don't have a film camera anymore so am unable to take test shots of a critically focussed test chart
Update:
Came across a reasonably priced test target (negative) called Vlad's Test Target (www.pixl-latr.com/product/vlads-test-target/)
:: Possible workflows ::
Preload ABC filmholders with neg strips
Take snap - LXXXXXXX.dng (using 2sec self-timer) then move FH to next frame
Options -
A: Lightroom 6.14: (LR perpetual)
Import camera DNG's into LR
Use Negative Lab Pro to invert and colour adjust (works OK on 10.13)
Use Pixelmator Pro to do dust cleaning manually OR use Photoshop with SRDx plugin to do automatic dust clean
B: Lightroom Classic: (LRc/PS bundle subscription)
Import camera DNG's into LR
Use Negative Lab Pro to invert and colour adjust
Use Photoshop with SRDx plugin to do automatic dust clean
C: Use Vuescan to do file scan of camera negs and invert negative (allows various film types, set brightness to 0.7)
Result can be exported as TIF or TIF DNG which can then be opened in either Iridient Developer/C1/Pixelmator Pro for adjustment
Use PP for manual dust cleaning.
D: Use Capture One with reversed curves then adjust WB, etc
Use PP for manual dust cleaning.
E: Use Iridient Developer with Invert Negative checked then adjust WB and Exposure
Use PP for manual dust cleaning.
Typical exposure details using this setup -
ISO 100
f8.0
1/20sec (with light source directly behind EFH diffusion screen - electronic shutter)
-0.3EV
5600K/100% (Raleno light source)
2sec selftimer
On balance after looking/trying quite a few variations of apps/workflow the LR Classic route is hard to beat quite simply as it allows most features for a fairly reasonable price (even though it is a bloody subscription!). Most of the non-subscription alternatives are quite pricey and are moving to a subscription model anyway (Capture One/On1/etc). There are cheaper apps out there but when it comes to negative scanning via camera most are deficient - they all do the colour adjustment stuff but vital things like dust removal are not implemented or need to be done in a manual kludgy manner. The SRDx plugin is the only real automatic cleaner out there and it only works on Photoshop (Adobe wins again). I tried the plugin with ON1 and GraphicConverter which both should support Photoshop plugins but the plugin did not function correctly with either app. Vuescan supports negative scanning from files quite well (no scanner required) but unfortunately the dust removal which is usually good requires the infrared channel of a scanner to be available - an SRDx like feature in Vuescan would be a killer feature especially outside the LR environment.
:: XPan scans ::
Most of my scans have been done for my XPan snaps but I have tried to optimize the XPan neg scanning process with this jig.
Basically the idea is to use MF on the CL and take two overlapping negs of the XPan frame and then use Panorama Stitcher (Planar Mode) to join them however at this stage results are not exact enough, I find the height of the second frame sometimes is different after the stitching which isn't usually an issue with Panorama Stitcher. At the moment I am looking at the possibilty of a slight bow in the long edge of the FH causing an issue. The other cause may be the fact that the negative focussing plane is very close (as opposed to normal real landscape views from the camera) and combined with lens curvature introduces linearity issues.
Note: To use the XPan template on the EFH and take one neg frame without stitching I would need a full frame camera which I don't have - hey ho!
Noticed also that Panorama stitching is also available on LR 6.14 and it works. The three options in LR are Spherical/Cylindrical & Perspective - I got excellent results with Perspective, the other two had very minor alignment issues (There is no Planar option as in Panorama Stitcher).
:: Scanner or Camera ::
For me the camera method is winning out as the quality is as good as the best I have achieved with scanners. Cost wise it is horses for courses - the camera method isn't too bad if you already have a suitable camera (and even a macro lens). A camera and lens can be used for things other than scanning whereas the scanners are useful for - well scanning. Reliability is far more of an issue with scanners than with cameras/lenses eg: a V850 to replace my old V700 would be north of £800 which is far more than bits & pieces for a camera scanning jig. If the Lightroom route is taken then both the Negative Lab Pro and SRDx plugins for LRc and Photoshop respectively make quite a good tool package. Next best would be Vuescan and Pixelmator Pro (dust removal) and then any photo app of your choice.
The SRDx plugin makes the LRc Photography Plan hard to resist since the dust/artifact cleaning is a huge time issue if it needs to be done manually.
Even though I try to keep the negs dust free whilst scanning it was the case that in the good ol' minilab days the neg strips were not always 100% clean and therefore had small spots baked in.
PrimeFilm XE Super Edition 35mm Film Scanner
This scanner is also known as the ProScan 10T and was sold by Reflecta (German partner company) in the European market - the units are basically manufactured in Taiwan.
Scanning negatives
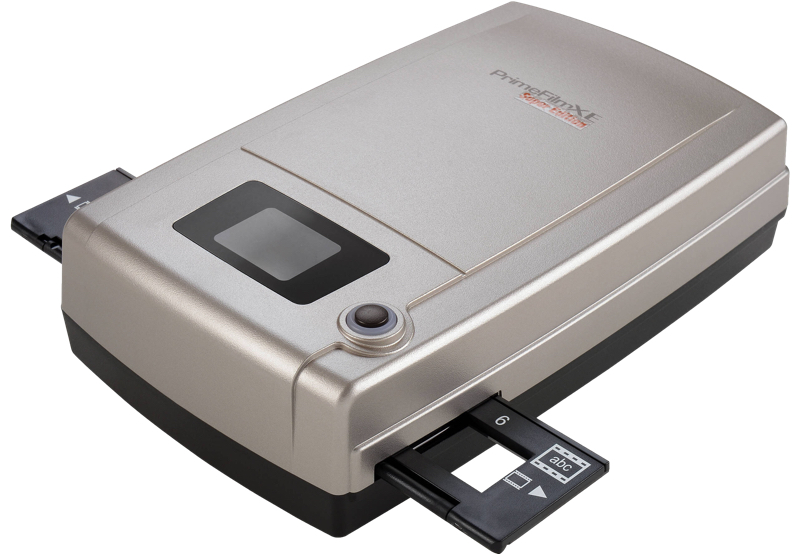
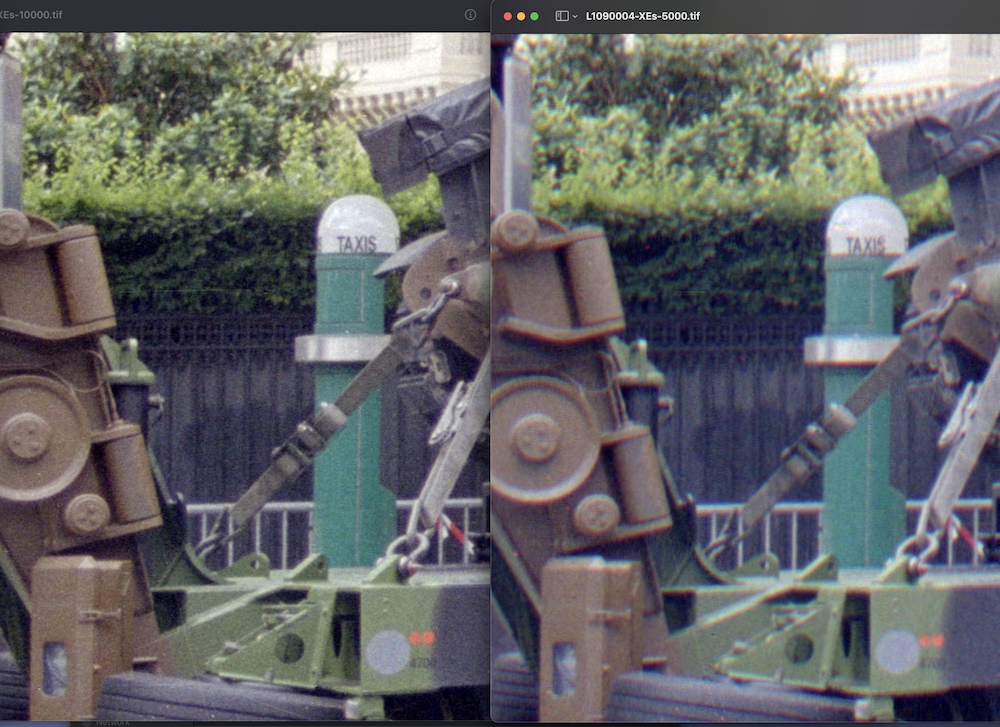
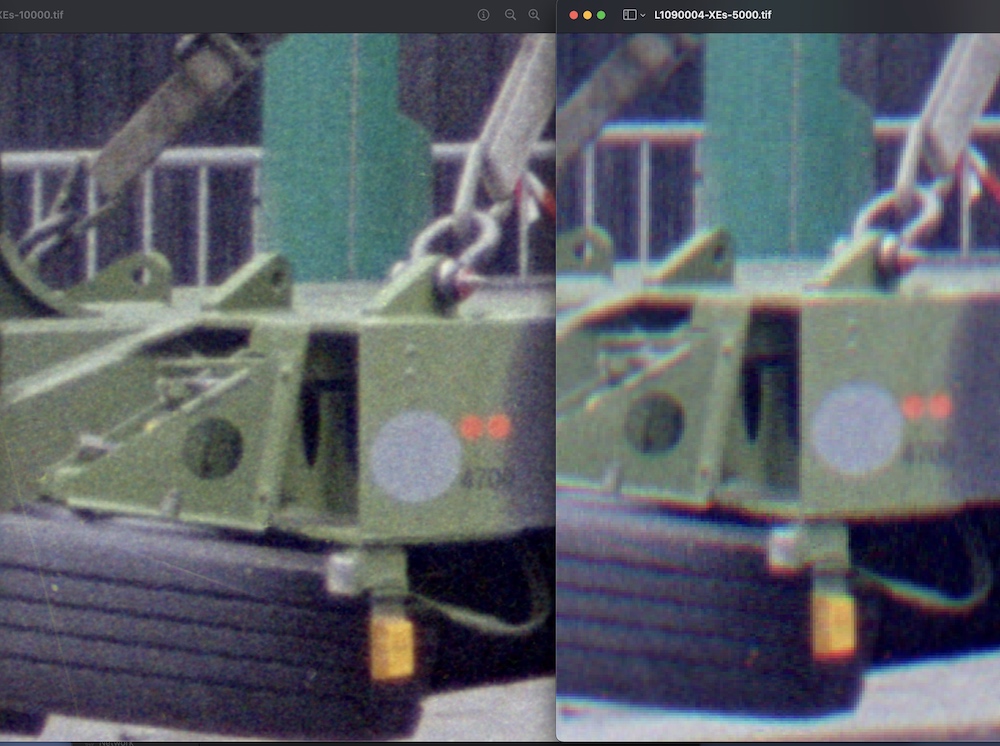
As related earlier my copy of the XEs scanner lasted c. 27 scans before failing so the consensus that this scanner is a bit of a lemon is not far from the truth however I managed to fix mine and once repaired it appears to work quite well. The resolution of the scanner is stated as 10000 dpi which according to other sources is probably bending the truth somewhat but in my case even though the resolution is erroneous I can only compare the output with what I got with the Epson 700 and the camera scan method. Using the 10000 dpi setting it looks to give better resolution than the other two methods. I can't comment on the Canon FS4000 since I sold that before going down the V700 route (it was slow) and I'm unable to conduct like for like tests.
The problem with scanners is they seem to be slow and unreliable but if the XEs keeps working then I shall use it for higher res scans which take a bit of time but the camera method will win out I think for bulk 35mm scans.
10000 vs 5000
10000 vs 5000 more zoom
Further info on XEs: https://www.closeuphotography.com/primefilm-xe-lens-test
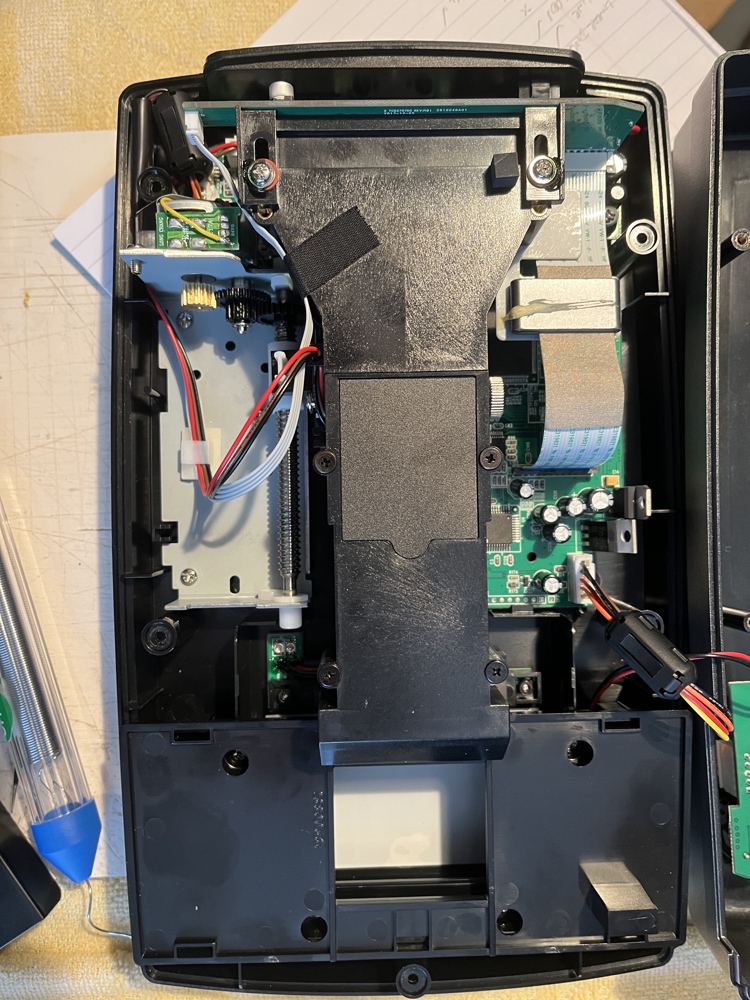
Internals:
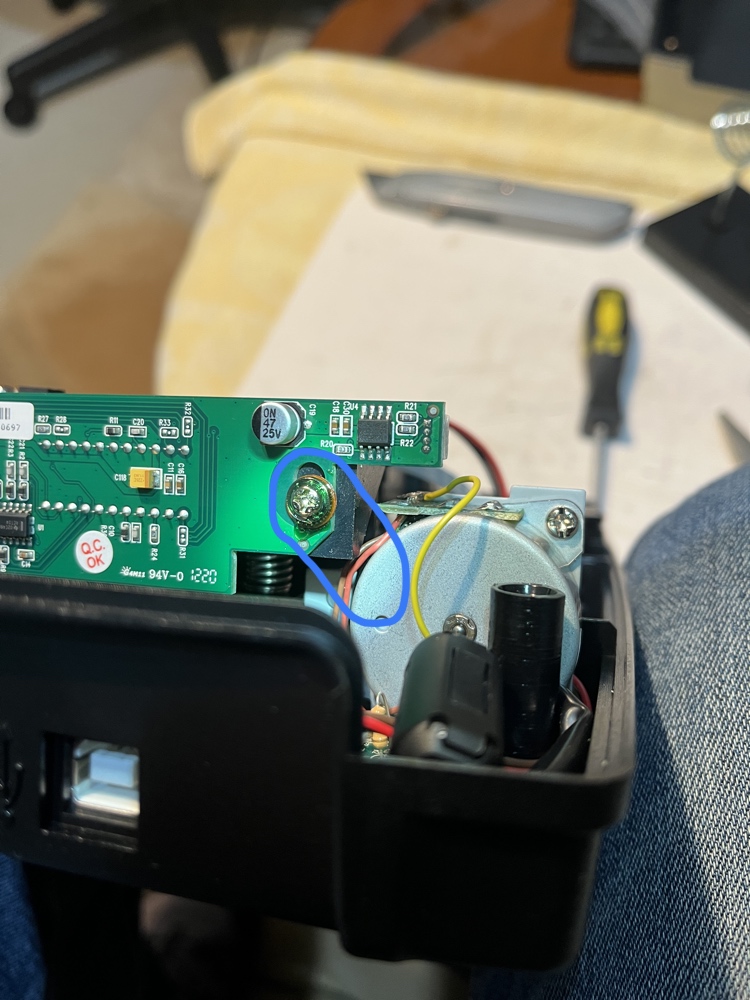
Some snaps showing problem areas - basically the wires going to the stepper motor control board are glued (or should be) to the stepper motor but the sensor gantry moves past the motor with very little room to spare. In my case the yellow wire was caught and broke away and the others would have been also if it wasn't for the fact that the righthand screw holding the PCB on the back of the gantry was loose and causing a misalignment of the sensor. The fix was to resolder the yellow wire and reroute the other wires across the back of the motor (using duct tape to keep them there) and allow the gantry to move freely past the motor. The righthand screw was also adjusted to correct the misalignment of the sensor. The build quality is shoddy.
Wire issue (note: loose screw and tight gap)
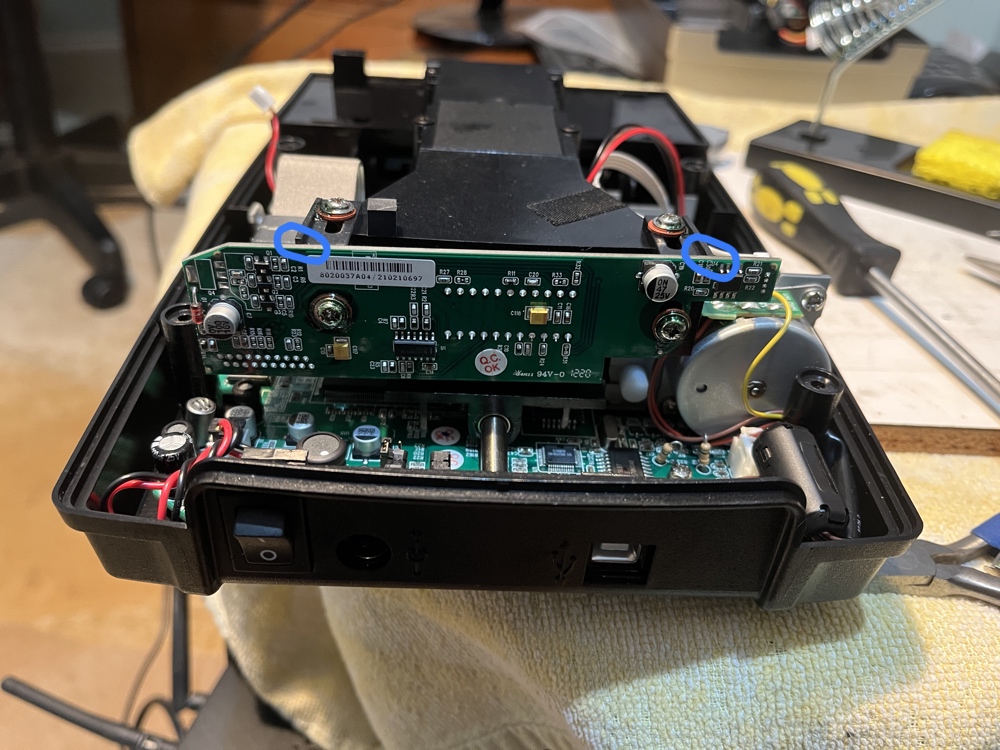
Gantry rear prior to fix (note: blue circles showing uneven positioning of PCB - compare with next snap)
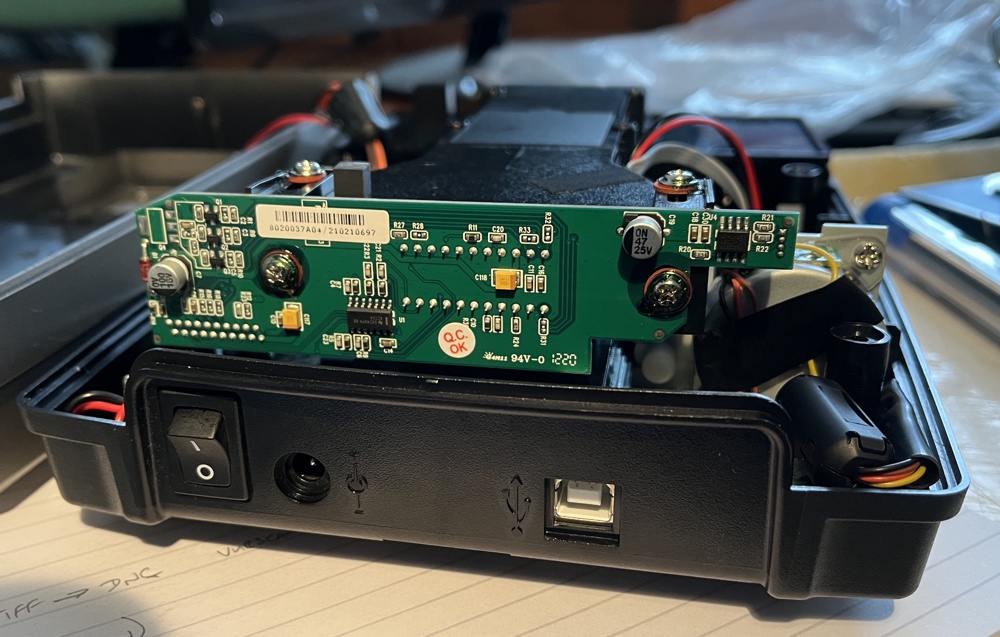
Gantry rear post fixes
Top view
Summary:
It should be noted that Pacific Image Electronics have recently re-issued a lot of the scanners and the new XE Plus may have better build quality. The price appears to have increased somewhat.
Driver downloads for the various models are available on the website so that is good ( www.scanace.com/product/film-scanners/ ). At this stage it doesn't look like Reflecta have re-issued the scanners for the Euro market though.
The CyberView scanning software works OK with the scanner but equally Vuescan can also be used with the XEs. At this stage I am trying both to produce a negative TIFF which can then be processed using Photoshop/ColorPerfect or LRc/Negative Lab Pro. As an aside I have found Iridient Developer an excellent app with plenty of options for noise reduction/sharpening and file saving (invert negative is also provided).
PlusTek scanners are the other popular brand around but I haven't tried them however I have noticed that some folk find the filmholders a bit flimsy - I think the ones used with the XEs are more robust (standard ABC type) so maybe that is an advantage. The main issue with the PrimeFilm scanner is that folk can never be certain they will get a good one.